Reading List Mark 2 - Part 2
This is Part 2 in a series about an example app that I put together to demonstrate and describe the use of various Google Apps Script features. See Part 1 for an introduction.
This part is “Using the Tasks API to retrieve and insert tasklists, and the Ui Services to build the tasklist chooser component“.
Parts overview
- Introduction to the app, and a short screencast showing the features
- Using the Tasks API to retrieve and insert tasklists, and the Ui Services to build the tasklist chooser component<– You Are Here
- Using the UrlFetch Services to interact with the Google+ API and grab info on articles pointed to by users in their activity stream
- Synchronising the URL list in the spreadsheet with corresponding tasks in the chosen tasklist
- Putting it all together and using the OnOpen event to insert a new 2-item menu entry on the spreadsheet’s page
Tasks API
The availability of the Tasks API within the Google Apps Script context was announced recently on the Google Code blog. Using the Google APIs Discovery Service makes it easier to build client libraries for the myriad APIs available; this is what Google have done to make the BigQuery, UrlShortener, Prediction and Tasks APIs available for us in Google Apps Script. Collectively they’re known as Google APIs Services.
Unlike the other services already available — such as those pertaining directly to the Google Apps platform like Spreadsheet, Gmail, DocsList and Calendar — you need to use the Google API Console to turn on these new APIs within the context of a project, agree to the terms & conditions, and note the courtesy call limits available to you.

You can see here a shot of the Tasks API selected for use within a project I created in the Google API Console, and a courtesy limit of 5000 calls per day. Check out a previous blog post “Automated Email-to-Task Mechanism with Google Apps Script” for more background on this Tasks API and the Google article “Integrating with Google APIs – Creating a simple reading list“ for a step-by-step account of enabling the API itself (called Tasks Services in Google Apps Script).
Working with Tasklists and Tasks
So, what do we need to do with the Tasks Services? As you can gather from watching the screencast in the Part 1, we need to retrieve a list of existing tasklists, we might need to create a new tasklist, and we need to be able to add tasks to a specific tasklist. We also need to build a Ui component to present the list of the user’s tasklists, so a tasklist can be chosen, plus an option to create a new tasklist.
Retrieving the Tasklists
Let’s start with retrieving a list of tasklists. While this is pretty simple, we’ll encapsulate it in a function as we’ll be calling it a couple of times within this example.
function getTasklists_() {
  var tasklistsList = Tasks.Tasklists.list();
  return tasklistsList.getItems();
}
We use the Tasklists member of the Tasks class which gives us a TasklistsCollection class. We call call the list() method to retrieve a Tasklists object – which represents a list of all the authenticated user’s tasklists. Calling getItems() on this object gives us an array of Tasklist objects – which is the list of tasklists that we need.
Building the Ui
We’ll need the list of tasklists to show in the Ui component. So let’s look at building that Ui component next. Building user interfaces in Google Apps Script can appear somewhat daunting at first glance, but don’t worry – it’s actually very straightforward. You have the choice between building the Ui in code (by using Ui Services calls) or using a visual editor much like you might in other IDEs. This latter approach was announced and described in detail on the Google Apps Developer blog, following this year’s Google I/O.
We’ll build our Ui in code. If you need an intro to this, have a look at the Google Apps Script “Building a User Interface” documentation.
We want to be able to display to the user a list of their existing tasklists so they can choose one, and also give them a chance to enter the name of a new tasklist instead. So we need a dropdown list (otherwise known as a listbox), a textbox, some text labels, and a button. This is what the end result should look like:
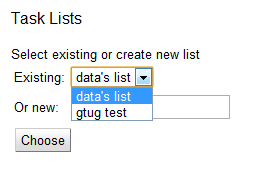
It’s showing the Ui title (“Task Lists”), some labels, a dropdown list with the two existing tasklists that the authenticated user has already, an empty textbox (behind the dropdown) where a new tasklist name can be entered and a button to which we can attach an event handler.
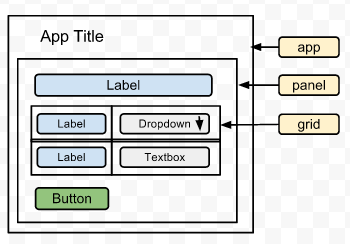
Layout is achieved using Panels and Grids, both containers for elements. Here, we’ll use a VerticalPanel, where the elements are arranged vertically, and a Grid, where we can arrange elements in a 2-dimensional way.
Schematically, this is what we’re going to do:
So, let’s look at the code that builds this Ui. We start by getting a handle on the active spreadsheet (doc), and creating a new Ui application (app), giving it a title. At the end of this function we’ll be passing the Ui application to the active spreadsheet to show.
function taskListUi() {
  var doc = SpreadsheetApp.getActiveSpreadsheet();
  var app = UiApp.createApplication();
  app.setTitle('Task Lists');
Next, we create a vertical panel (panel), and a listbox (lb), both of which exist independently. We set a name for the listbox (‘existingList’) so we can refer to it later in the callback context. After using the getTasklists_() function described earlier, we fill the listbox with those tasklist names (or ‘titles’) retrieved.
  // We'll have a grid and a button in this
  // vertical panel
  var panel = app.createVerticalPanel();

  // Use a listbox to display a choice of existing tasklists
  var lb = app.createListBox(false);
  lb.setName("existingList");
  var tasklists = getTasklists_();
  for (var tl in tasklists) {
    lb.addItem(tasklists[tl].getTitle());
  }
Once we’ve got the listbox populated, it’s time to create the grid (a 2 x 2 layout) and fill the cells with labels, the listbox, and a textbox. We give a name to the textbox (‘newList’) so we can refer to it later in the callback context, in the same way as for the listbox.
  // Use the grid to layout the listbox, a textbox for a new list,
  // and some corresponding labels
  var grid = app.createGrid(2, 2);
  grid.setWidget(0,0, app.createLabel("Existing:"));
  grid.setWidget(0,1, lb);
  grid.setWidget(1,0, app.createLabel("Or new:"));
  grid.setWidget(1,1, app.createTextBox().setName("newList"));
Finally we have the button element. Simple enough, but we also need to add a click handler to it in the form of a serverClickHandler. This handler exists as a function in this same script: handleChooseButton_() which is defined after this. The important thing to notice here is that we create an independent serverClickHandler, give it some element context (in this case the grid element we created earlier) so that the element values are available in the context of the handling function, and then assign that handler as a click handler to the button element.
  // The only button; handler will be linked to this button click event
  // Remember to add the grid contents to the callback context
  var button = app.createButton("Choose");
  var chooseHandler = app.createServerClickHandler("handleChooseButton_");
  chooseHandler.addCallbackElement(grid);
  button.addClickHandler(chooseHandler);
Once we’ve created the button element and sorted out how the click event will be handled, it’s time to put the Ui together. We add the elements one by one to the vertical panel: a label, the 2 x 2 grid, then the button. Then we add the actual panel to the app, hand it over to the active spreadsheet to be displayed, and let go!
  // Put it all together and show it
  panel.add(app.createLabel("Select existing or create new list"));
  panel.add(grid);
  panel.add(button);
  app.add(panel);
  doc.show(app);
}
Handling the Button Click
The handling of the click is performed by handleChooseButton_(), as determined by the call to createServerClickHandler() earlier. Let’s examine handleChooseButton_() step by step.
We start by assuming that the user has chosen an existing tasklist – we get the value from the listbox via its name within the parameter attribute of the event object passed to the function, i.e. e.parameter.existingList. Then again, if we’ve got a value in the textbox representing the option to create a new tasklist, we create a new tasklist using the Tasks.newTaskList() method of the Tasks Services, and give that new tasklist the title that was specified in the textbox.
Note that setTitle() was called directly in a ‘chain’ from newTaskList(), and the result assigned to the newTaskList variable. This is possible due to the way the Tasks API has been designed, with most TaskList methods returning the TaskList object itself; this is known as the ‘bean’ object.
function handleChooseButton_(e) {
  // Assume an existing list was chosen
  var selectedList = e.parameter.existingList;

  // But check for a new list being specified; if it as, create
  // a new task list
  if(e.parameter.newList != '') {
    selectedList = e.parameter.newList;
    var newTaskList = Tasks.newTaskList().setTitle(selectedList);
    Tasks.Tasklists.insert(newTaskList);
  }
Now we’ve determined the chosen tasklist (either an existing one or a newly created one) we grab the complete list with getTasklists_() and have a look through them to find the corresponding tasklist id, which we’ll need when we want to insert new tasks into that tasklist.
  // Grab the list of tasklists, because we'll need the id
  var taskLists = getTasklists_();
  var taskListId = -1;
  for(tl in taskLists){
    if(taskLists[tl].getTitle() === selectedList) {
      taskListId = taskLists[tl].getId();
      break;
    }
  }
Ok, we’ve determined and retrieved the id for the chosen tasklist, so now it’s time to save that info. We’ll do that by writing both the tasklist name and id into a cell; the tasklist name into the cell itself, and the id into the cell’s comment. This is a common idiom and is quite useful – you can store related information in a single cell, and don’t use up too much cell ‘real estate’. The cell we’re going to use is stored as a constant: READINGLISTCELL; in my spreadsheet that’s cell D1.
  // Record the list name and id
  var sh = SpreadsheetApp.getActiveSheet();
  var cell = sh.getRange(READINGLISTCELL);
  cell.setValue(selectedList);
  cell.setComment(taskListId);
Once we’ve stored the information, it’s time for the handler to make sure the Ui is closed, and to acknowledge to the user that a selected list has been recognised. We do this by closing the active Ui application, and using the Spreadsheet’s generic ‘toast‘ mechanism to pop up a message.
  // Close the Ui popup and display the name of the chosen list
  var app = UiApp.getActiveApplication();
  app.close();
  SpreadsheetApp.getActiveSpreadsheet().toast(selectedList, "Selected List", 3);
  return app;
}
Hurray – that’s the Ui component and the handler all taken care of!
Tune in next time when in Part 3 we look at retrieving information from the Google+ activity stream via the Google+ API, using nothing more than our trusty Google Apps Script HTTP client, UrlFetchApp.
- ← Previous
Reading List Mark 2 - Part 1 - Next →
Reading List Mark 2 - Part 3