In 2022 on our SAP Developers YouTube channel, I ran a series of live streams on the Hands-on SAP Dev show, where we went back to basics on OData. You can watch all of the episodes via this playlist: Back to basics: OData
In working through content on OData, it's hard not to notice the related topic of annotations. And I think it's fair to say that to some folks (myself included), annotations can seem somewhat mysterious, almost a dark art.
So I've written this deep dive post into exploring annotations, in CDS and in OData, and how they work together. It might help you better understand them, or at least feel more comfortable when you stare at them. I'd love to know what you think - please leave a comment at the bottom of this post.
The accompanying repository and simple app
There's a repository that was created to accompany the series of live streams: Back to basics: OData.
And to accompany this deep-dive post, we'll use a simple app. The specific app we'll use is the one that is built over the series of exercises in the (now archived) repo for the SAP CodeJam on CAP with Node.js.
The app is included in the Back to basics: OData repo, specifically in the bookshop directory in the annotations branch.
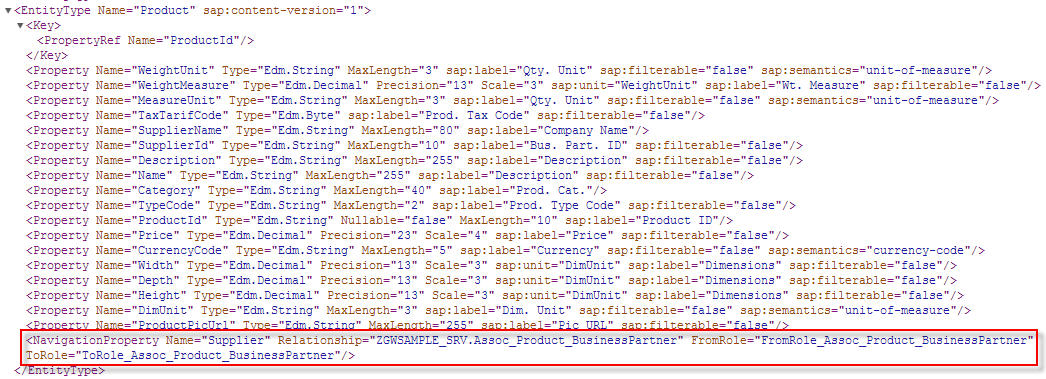
In particular, we will examine specific parts of the app, namely the annotations in the index.cds and service.cds files in the srv/ directory.
Getting things running
If you want to play along, get things set up and running first.
Clone the repository, switch to tracking the annotations branch, and move into the bookshop/ directory:
git clone https://github.com/SAP-samples/odata-basics-handsonsapdev/ \
&& cd odata-basics-handsonsapdev \
&& git checkout annotations \
&& cd bookshop
Then start the CAP server up:
cds run
You should see some output similar to this:
[cds] - loaded model from 4 file(s):
db/schema.cds
srv/index.cds
../../../home/user/.npm-global/lib/node_modules/@sap/cds-dk/node_modules/@sap/cds/common.cds
srv/service.cds
[cds] - connect to db > sqlite { url: 'db.sqlite', database: 'bookshop.db' }
Service name: CatalogService
Service name: Stats
[cds] - serving CatalogService { path: '/catalog', impl: 'srv/service.js' }
[cds] - serving Stats { path: '/stats', impl: 'srv/service.js' }
[cds] - server listening on { url: 'http://localhost:4004' }
[cds] - launched at 3/10/2023, 2:07:18 PM, version: 6.4.0, in: 536.41ms
[cds] - [ terminate with ^C ]
If so, you're all set!
The annotations
This section is fairly long, and is a journey through annotations in the service layer of the CAP application in this directory. There are the following sections:
We start here with a brief introduction to annotations in CAP and CDS.
Then we look at a singular annotation in service.cds.
After that, we take a look at a more complex set of annotations in index.cds, with an exploration of OData annotation vocabularies in general, a specific look at one particular vocabulary (the UI annotation vocabulary), a brief overview of the syntax for annotations in CDS, a deep dive into annotation values (primitives, collections and records), how to express multiple annotations in CDS, rounding off this branch of exploration with an examination of annotation vocabulary references.
After that exploration of theory, we're ready for interpreting the annotation details, wherein we look at the DataFieldAbstract type, the UI.Identification term, the UI.LineItem term, the UI.SelectionFields term and the UI.HeaderInfo term, all of which are used in the annotations in index.cds.
Finally, we turn to the OData metadata document, and take some time examining the OData annotations in EDMX, paying close attention to namespace references and then annotation targets, before moving on to look at the actual EDMX generated for the annotations used - the UI.Identification annotation, the UI.SelectionFields annotation, the UI.LineItem annotation and the UI.HeaderInfo annotation. To put everything into context, the CatalogService's metadata is shown in its entirety.
Here's a brief overview of the annotations used in the service layer, which is part of this app. Note that the word "annotation" is used in two different contexts here:
- Annotations in CAP in CDS form are used to describe and augment core data service definitions, and are prefixed with the
@ symbol
- OData annotations, organised into vocabularies, that provide extra information on an OData service's metadata and appear in the EDMX definition (in the
$metadata document)
When used in an OData context (i.e. when describing an OData service in CDS) the CAP annotations will result in valid OData annotations. These annotations will belong to either standard OData vocabularies, or SAP specific vocabularies.
Note that "A service MUST NOT require the client to understand custom annotations in order to accurately interpret a response" (see the Vocabulary Extensibility section of OData Version 4.0. Part 1: Protocol Plus Errata 03). In other words, beyond annotations in the "Core" vocabulary, think of further annotations as suggestions.
In service.cds
CDS annotation: @readonly
Used at the entity level, this CDS annotation generates specific terms in the OData "Capabilities" vocabulary.
Specifically, this line:
@readonly entity OrderInfo as projection on my.Orders ...
causes these OData annotation terms to be generated and included in the service metadata document: DeleteRestrictions, InsertRestrictions and UpdateRestrictions.
You can see this for yourself using the cds command line tool to generate EDMX for the Stats service defined within the srv/service.cds file, which looks like this:
using my.bookshop as my from '../db/schema';
// ...
service Stats {
@readonly entity OrderInfo as projection on my.Orders excluding {
createdAt,
createdBy,
modifiedAt,
modifiedBy,
book,
country
}
}
This is how you do it:
cds compile srv --service Stats --to edmx-v4
This produces the following output - note the <Annotations> element:
<?xml version="1.0" encoding="utf-8"?>
<edmx:Edmx Version="4.0" xmlns:edmx="http://docs.oasis-open.org/odata/ns/edmx">
<edmx:Reference Uri="https://oasis-tcs.github.io/odata-vocabularies/vocabularies/Org.OData.Capabilities.V1.xml">
<edmx:Include Alias="Capabilities" Namespace="Org.OData.Capabilities.V1"/>
</edmx:Reference>
<edmx:DataServices>
<Schema Namespace="Stats" xmlns="http://docs.oasis-open.org/odata/ns/edm">
<EntityContainer Name="EntityContainer">
<EntitySet Name="OrderInfo" EntityType="Stats.OrderInfo"/>
</EntityContainer>
<EntityType Name="OrderInfo">
<Key>
<PropertyRef Name="ID"/>
</Key>
<Property Name="ID" Type="Edm.Guid" Nullable="false"/>
<Property Name="quantity" Type="Edm.Int32"/>
</EntityType>
<Annotations Target="Stats.EntityContainer/OrderInfo">
<Annotation Term="Capabilities.DeleteRestrictions">
<Record Type="Capabilities.DeleteRestrictionsType">
<PropertyValue Property="Deletable" Bool="false"/>
</Record>
</Annotation>
<Annotation Term="Capabilities.InsertRestrictions">
<Record Type="Capabilities.InsertRestrictionsType">
<PropertyValue Property="Insertable" Bool="false"/>
</Record>
</Annotation>
<Annotation Term="Capabilities.UpdateRestrictions">
<Record Type="Capabilities.UpdateRestrictionsType">
<PropertyValue Property="Updatable" Bool="false"/>
</Record>
</Annotation>
</Annotations>
</Schema>
</edmx:DataServices>
</edmx:Edmx>
These annotation terms basically say - to those consuming apps that can interpret them - that delete, insert or update operations may not be performed on the OrderInfo entity.
In case you're wondering - these restrictions that are imposed via the @readonly decoration in the CDS definition are actually implemented in CAP.
Assuming that the service is running (with cds run) you can try this yourself, like this:
curl
--silent \
--header 'Content-Type: application/json' \
--include \
--data '{"quantity": 10}' \
--url 'http://localhost:4004/stats/OrderInfo'
This produces the following:
HTTP/1.1 405 Method Not Allowed
X-Powered-By: Express
x-correlation-id: 3a80f986-2acd-4663-8116-d9b39d532f31
OData-Version: 4.0
content-type: application/json;odata.metadata=minimal
Date: Thu, 07 Jul 2022 10:57:04 GMT
Connection: keep-alive
Keep-Alive: timeout=5
Content-Length: 104
{"error":{"code":"405","message":"Entity \"Stats.OrderInfo\" is read-only","@Common.numericSeverity":4}}
Nice!
In index.cds
In this file, srv/index.cds, you can see the explicit annotate directive in action. This is contrast to the previous example, where the @readonly annotation was specified directly with the definition of what was being annotated.
(There's a parallel here to a feature of OData annotations, and how they're served. In a similar way to how annotations in CDS can be either alongside, or separate from, the data definitions they're describing, so also can OData annotations be served in the same EDMX document (the OData service's metadata document) or as a separate resource. Not anything earth shatteringly important, but worth mentioning here.)
annotate CatalogService.Books with @(
UI: {
Identification: [ {Value: title} ],
SelectionFields: [ title ],
LineItem: [
{Value: ID},
{Value: title},
{Value: author.name},
{Value: author_ID},
{Value: stock}
],
HeaderInfo: {
TypeName: '{i18n>Book}',
TypeNamePlural: '{i18n>Books}',
Title: {Value: title},
Description: {Value: author.name}
}
}
);
This example is considerably more involved than the @readonly example previously. Let's take it bit by bit. You may also want to refer to the OData Annotations section of the CAP documentation.
OData annotation vocabularies
First, let's consider the simple and single word "readonly", and then what appears to be words ("UI", "Identification", "LineItem", "Value", etc) within a wider syntactical structure in this larger example.
The previous @readonly example was a CDS annotation that resulted in the generation of multiple OData annotations.
In this current example, what we're looking at are annotations that are closer to the direct use of the combination of the OData annotation concepts of "vocabulary" and "term". To understand this better, let's start by taking a step back, and staring at the OData annotation vocabularies for a few minutes.
Put simply, OData annotations are expressed in the form of terms, which are grouped together into vocabularies.
The standards document OData Vocabularies Version 4.0 Committee Specification / Public Review Draft 01 outlines six vocabularies as follows (the summary document OData specs provides some information on the different document stages such as "Committee Specification" and "Public Review"):
| Vocabulary |
Namespace |
Description |
| Core |
Org.OData.Core.V1 |
Terms describing behavioral aspects along with annotation terms that can be used to define other vocabularies (yes, meta all the things!) |
| Capabilities |
Org.OData.Capabilities.V1 |
Terms that provide a way for service authors to describe certain capabilities of an OData Service |
| Measures |
Org.OData.Measures.V1 |
Terms describing monetary amounts and measured quantities |
| Validation |
Org.OData.Validation.V1 |
Terms describing validation rules |
| Aggregation |
Org.OData.Aggregation.V1 |
Terms describing which data in a given entity model can be aggregated, and how |
| Authorization |
Org.OData.Authorization.V1 |
Terms describing a web authorization flow |
If you like rabbit holes, note that all the vocabularies are described in machine-readable format ... using terms in the Core vocabulary. Even the Core vocabulary itself. Don't forget to come back once you've explored!
In the Introduction section of the standards document, it says that "Other OData vocabularies may be created, shared, and maintained outside of this work product".
And so there are other OData annotation vocabularies, for different purposes. SAP has created some, and they are documented publicly in the SAP/odata-vocabularies repository on GitHub. Amongst the SAP vocabularies, there are ones called Analytics, Communication, DataIntegration and also one called Common which contains terms common for all SAP vocabularies.
The UI annotation vocabulary
Another one in that list from SAP is the UI vocabulary, containing terms relating to presenting data in user interfaces.
Staring at the table of Terms in this vocabulary (or any for that matter) will help us interpret the CDS in index.cds we saw earlier, in other words, this:
annotate CatalogService.Books with @(...);
More specifically it will help us to interpret everything inside the @(...).
Looking at the contents of that table of terms, we see something like this (this excerpt shows just some of the many terms):
Note that there are terms, and there are types. A term has a value, which is of a certain type.
In the table we can recognize some of the content that we saw in index.cds as terms in this UI Vocabulary:
IdentificationSelectionFieldsLineItemHeaderInfo
Note in each case, the type is a single (camelcased) word. The word may be wrapped in square brackets, which denotes a collection of values of that type.
In the table exerpt above, most of the single words are also hyperlinked. For example, following HeaderInfoType leads to a table of properties that belong to that type, i.e. properties that the type consists of - in other words, the type is a structure (called a record, or object, see later).
This is how the HeaderInfoType type is described, in terms of the properties within:
| Property |
Type |
Description |
| TypeName |
String |
Name of the main entity type |
| TypeNamePlural |
String |
Plural form of the name of the main entity type |
| Title |
DataFieldAbstract? |
Title, e.g. for overview pages
This can be a DataField and any of its children, or a DataFieldForAnnotation targeting ConnectedFields. |
| Description |
DataFieldAbstract? |
Description, e.g. for overview pages
This can be a DataField and any of its children, or a DataFieldForAnnotation targeting ConnectedFields. |
| Image (Experimental) |
Stream? |
Image for an instance of the entity type. If the property has a valid value, it can be used for the visualization of the instance. If it is not available or not valid the value of the property ImageUrl can be used instead. |
| ImageUrl |
URL? |
Image URL for an instance of the entity type. If the property has a valid value, it can be used for the visualization of the instance. If it is not available or not valid the value of the property TypeImageUrl can be used instead. |
| TypeImageUrl |
URL? |
Image URL for the entity type |
| Initials (Experimental) |
String? |
Latin letters to be used in case no Image, ImageUrl, or TypeImageUrl is present |
With this knowledge, we can now understand, for example, that the value for the HeaderInfo term is a record of properties including TypeName, TypeNamePlural, Title and so on.
There's one term in the main table of terms excerpt that has a type that is not hyperlinked. The term is SelectionFields and the type is PropertyPath. That's because that type is not a structure, but a single, scalar thing (also called a primitive). This implies that the value for the SelectionFields term is a collection of paths to properties.
If you're wondering about the ? suffix on some of the types, ignore it for now - it doesn't help our understanding that we need here.
Syntax for annotations in CDS
Another aspect that we need to consider when attempting to parse the annotations above, is CDS's annotation syntax. For any given term in a vocabulary, the annotation is written as follows:
@vocabulary.term
followed by the value for that annotation.
There are also qualified annotations of which you should be aware, but they're not in play in these examples.
Multiple annotations can be specified in one go by listing them one after another, or, more commonly, by listing them inside a @(...) construct and separating them with commas. We can clearly see this in action in our index.cds example.
Annotation values
The final piece in the puzzle to understanding and interpreting annotation definitions and the EDMX content that is generated is the set of different value types for annotation terms. If you're familiar with the core value types in many programming languages, you'll be at home here. There are:
| Value Type |
Alternative Name |
Example |
| Primitive |
Scalar |
a string, boolean value or number |
| Record |
Object |
a collection of name value pairs like this: { name1: value1, name2: value2, ... } |
| Collection |
Array |
a list of other types, either primitives or records, enclosed in [ ... ] |
Examples for each of these will help us to get a feel for their general shape.
For these examples, we'll use the most basic of service definitions in CDS, and annotate it as appropriate.
The base definition looks like this:
service Northwind {
entity Categories {
key ID: Integer;
description: String;
}
}
And the basic EDMX generated from this (see how we did it earlier with the cds compile command) is as follows:
<?xml version="1.0" encoding="utf-8"?>
<edmx:Edmx Version="4.0" xmlns:edmx="http://docs.oasis-open.org/odata/ns/edmx">
<edmx:DataServices>
<Schema Namespace="Northwind" xmlns="http://docs.oasis-open.org/odata/ns/edm">
<EntityContainer Name="EntityContainer">
<EntitySet Name="Categories" EntityType="Northwind.Categories"/>
</EntityContainer>
<EntityType Name="Categories">
<Key>
<PropertyRef Name="ID"/>
</Key>
<Property Name="ID" Type="Edm.Int32" Nullable="false"/>
<Property Name="description" Type="Edm.String"/>
</EntityType>
</Schema>
</edmx:DataServices>
</edmx:Edmx>
Note that there are no annotations in this EDMX yet.
Primitive example: vocabulary Core, term Description
The Core vocabulary contains a number of primitive terms, one of which is Description. This has the type String and itself is described as "A brief description of a model element".
For a brief look down the rabbit hole, take a look at the definitive description of the Core vocabulary terms, in Org.OData.Core.V1.xml, where the Core terms are defined, including this one:
<Term Name="Description" Type="Edm.String">
<Annotation Term="Core.Description" String="A brief description of a model element" />
<Annotation Term="Core.IsLanguageDependent" />
</Term>
Wait, what? Is the Core.description term itself annotated ... with the Core.description term? Yes. But let's pull ourselves back from the hole and continue with this example and our sanity (although if, like me, you do like to dive in, and are wondering how to annotate annotations in CDS, there's a section in the CAP documentation that covers that: Annotating annotations).
Let's annotate the Categories entity type with this term (there are different ways to add annotations in CDS - refer to the CAP annotation syntax for more information):
This results in:
<?xml version="1.0" encoding="utf-8"?>
<edmx:Edmx Version="4.0" xmlns:edmx="http://docs.oasis-open.org/odata/ns/edmx">
<edmx:Reference Uri="https://oasis-tcs.github.io/odata-vocabularies/vocabularies/Org.OData.Core.V1.xml">
<edmx:Include Alias="Core" Namespace="Org.OData.Core.V1"/>
</edmx:Reference>
<edmx:DataServices>
<Schema Namespace="Northwind" xmlns="http://docs.oasis-open.org/odata/ns/edm">
<EntityContainer Name="EntityContainer">
<EntitySet Name="Categories" EntityType="Northwind.Categories"/>
</EntityContainer>
<EntityType Name="Categories">
<Key>
<PropertyRef Name="ID"/>
</Key>
<Property Name="ID" Type="Edm.Int32" Nullable="false"/>
<Property Name="description" Type="Edm.String"/>
</EntityType>
<Annotations Target="Northwind.Categories">
<Annotation Term="Core.description" String="The general type of product"/>
</Annotations>
</Schema>
</edmx:DataServices>
</edmx:Edmx>
Picking out the annotations here, we see this:
<Annotations Target="Northwind.Categories">
<Annotation Term="Core.description" String="The general type of product"/>
</Annotations>
Set within an <Annotations> element based container that is used to identify the target of the annotations contained within, the single <Annotation> element uses attributes to convey the term and the primitive value. Nice and simple.
Record example: vocabulary Capabilities, term DeleteRestrictions
This is one we've seen before. The standard Capabilities vocabulary contains the DeleteRestrictions term, the value for which is a record, of type DeleteRestrictionsType.
The definitive definition of this can be found in Org.OData.Capabilities.V1.xml, as a combination of two things:
- the term itself (
DeleteRestrictions)
- a definition of the type (
DeleteRestrictionsType)
The term is defined thus:
<Term Name="DeleteRestrictions" Type="Capabilities.DeleteRestrictionsType" Nullable="false" AppliesTo="EntitySet Singleton Collection">
<Annotation Term="Core.AppliesViaContainer" />
<Annotation Term="Core.Description" String="Restrictions on delete operations" />
</Term>
The term itself is annotated with a couple of terms from the Core vocabulary too. But what's important here is that the type of the term. The type of the Description term in the Core vocabulary term's type is declared as Edm.String:
<Term Name="Description" Type="Edm.String">
But for this Capabilities vocabulary's DeleteRestrictions term, the type is declared as Capabilities.DeleteRestrictionsType. Moreover, this type definition comes next, in the form of a normal OData EDMX ComplexType definition, something we'd see in other OData services, outside the context of just annotations, to describe thing such as cities or locations, like in the OData metadata document for the V4 sample OData service "TripPin":
<edmx:Edmx Version="4.0" xmlns:edmx="http://docs.oasis-open.org/odata/ns/edmx">
<edmx:DataServices>
<Schema Namespace="Microsoft.OData.SampleService.Models.TripPin" xmlns="http://docs.oasis-open.org/odata/ns/edm">
<ComplexType Name="City">
<Property Name="CountryRegion" Type="Edm.String" Nullable="false"/>
<Property Name="Name" Type="Edm.String" Nullable="false"/>
<Property Name="Region" Type="Edm.String" Nullable="false"/>
</ComplexType>
<ComplexType Name="Location" OpenType="true">
<Property Name="Address" Type="Edm.String" Nullable="false"/>
<Property Name="City" Type="Microsoft.OData.SampleService.Models.TripPin.City" Nullable="false"/>
</ComplexType>
...
So record style annotation types are defined with the <ComplexType> element, and this DeleteRestrictionsType looks like this (to keep it brief, only a few properties are shown here):
<ComplexType Name="DeleteRestrictionsType">
<Property Name="Deletable" Type="Edm.Boolean" Nullable="false" DefaultValue="true">
<Annotation Term="Core.Description" String="Entities can be deleted" />
</Property>
<Property Name="NonDeletableNavigationProperties" Type="Collection(Edm.NavigationPropertyPath)" Nullable="false">
<Annotation Term="Core.Description" String="These navigation properties do not allow DeleteLink requests" />
</Property>
<Property Name="MaxLevels" Type="Edm.Int32" Nullable="false" DefaultValue="-1">
<Annotation Term="Core.Description" String="The maximum number of navigation properties that can be traversed when addressing the collection to delete from or the entity to delete. A value of -1 indicates there is no restriction." />
</Property>
</ComplexType>
Where have we seen this term in use before? In the EDMX generated from the @readonly annotation in service.cds. Here's the relevant exerpt from the XML we saw earlier:
<Annotations Target="Stats.EntityContainer/OrderInfo">
<Annotation Term="Capabilities.DeleteRestrictions">
<Record Type="Capabilities.DeleteRestrictionsType">
<PropertyValue Property="Deletable" Bool="false"/>
</Record>
</Annotation>
...
</Annotations>
Having meditated a little on how these terms and types are defined, we can more comfortably approach the EDMX annotation content and pick out what's what. In this excerpt, we can now understand:
- the annotation is targeting the
OrderInfo entity set due to the value of the Target attribute in the container <Annotations> element
- the type of the annotation itself is a record, which means there's no primitive value conveyed as an attribute in the
<Annotation> element
- instead, the
<Annotation> element contains a child <Record> element
- that
<Record> element is described by the type Capabilities.DeleteRestrictionsType
- it contains a single property / value pair, in the form of a
<PropertyValue> element; attributes in this element convey the property (Deletable) and the corresponding value (false)
Indeed, the content of the <PropertyValue> element here makes sense to us now, because we've seen the appropriate definition in the <ComplexType> where the DeleteRestrictionsType is defined:
<Property Name="Deletable" Type="Edm.Boolean" Nullable="false" DefaultValue="true">
<Annotation Term="Core.Description" String="Entities can be deleted" />
</Property>
Remember that the CDS annotation used, @readonly, is basically expanded into the appropriate terms. There's a section in the CAP documentation on Adding Fiori apps to projects that shows us what the actual equivalent of this shorthand @readonly annotation is:
entity Categories @(Capabilities:{
InsertRestrictions.Insertable: false,
UpdateRestrictions.Updatable: false,
DeleteRestrictions.Deletable: false
}) {
...
}
(The other annotations here are also generated in the EDMX, but we've just focused on the Capabilities.DeleteRestrictions term for now.)
We're getting closer to being fully comfortable with the CDS annotation constructs in index.cds. And in fact here we can see something that links where we are on the journey with what we saw back there. And that is the way that the actual Capabilities terms, along with the values for the properties of the corresponding records, are expressed.
Consider that, in the context of a term that is described by a record type, we have three levels:
- Vocabulary
- Term
- Property (via Type)
In the Capabilities vocabulary, the DeleteRestrictions term is described by the DeleteRestrictionsType type, which contains a number of properties, one of which is Deletable. This property is written in CDS annotation terms in a dotted notation, followed by a colon, and then the value
Capabilities.DeleteRestrictions.Deletable: false
This expression is not exactly what we see in the longhand equivalent of @readonly above, but we can see that it works, by using it to annotate our test Categories entity precisely:
service Northwind {
@Capabilities.DeleteRestrictions.Deletable: false
entity Categories {
key ID: Integer;
description: String;
}
}
This will cause the following to be generated:
<?xml version="1.0" encoding="utf-8"?>
<edmx:Edmx Version="4.0" xmlns:edmx="http://docs.oasis-open.org/odata/ns/edmx">
<edmx:Reference Uri="https://oasis-tcs.github.io/odata-vocabularies/vocabularies/Org.OData.Capabilities.V1.xml">
<edmx:Include Alias="Capabilities" Namespace="Org.OData.Capabilities.V1"/>
</edmx:Reference>
<edmx:DataServices>
<Schema Namespace="Northwind" xmlns="http://docs.oasis-open.org/odata/ns/edm">
<EntityContainer Name="EntityContainer">
<EntitySet Name="Categories" EntityType="Northwind.Categories"/>
</EntityContainer>
<EntityType Name="Categories">
<Key>
<PropertyRef Name="ID"/>
</Key>
<Property Name="ID" Type="Edm.Int32" Nullable="false"/>
<Property Name="description" Type="Edm.String"/>
</EntityType>
<Annotations Target="Northwind.EntityContainer/Categories">
<Annotation Term="Capabilities.DeleteRestrictions">
<Record Type="Capabilities.DeleteRestrictionsType">
<PropertyValue Property="Deletable" Bool="false"/>
</Record>
</Annotation>
</Annotations>
</Schema>
</edmx:DataServices>
</edmx:Edmx>
If you're wondering about the lack of @(...) in this example, rest assured, we'll get to it.
Collection example: vocabulary Capabilities, term DeleteRestrictions
The last value type, collection, is used to express an array of values. Those values themselves can be primitive, or they can be records, which in turn contain further values. This is the same concept that can be found in data structures when programming or using declarative modeling in notations such as JSON. For example, a collection, or an array can contain a list of scalars:
[ 1, 2, 3 ]
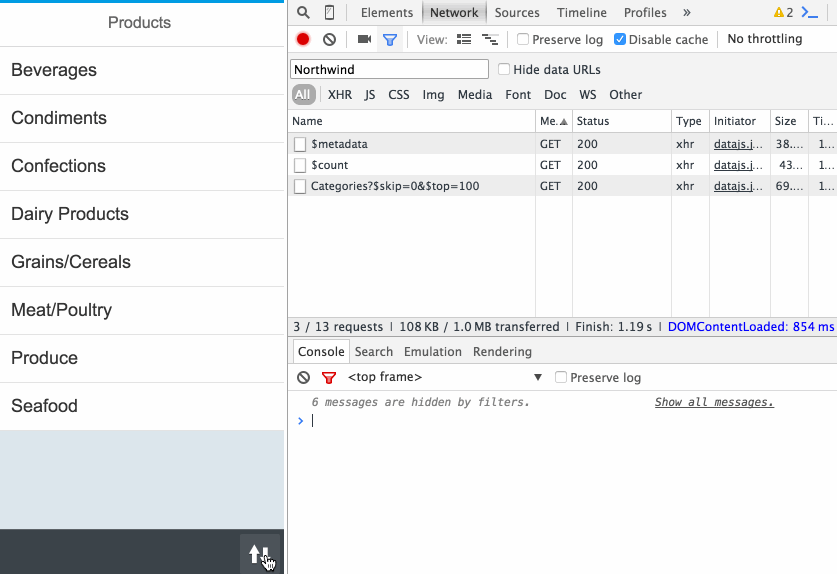
Or it can contain more complex values such as objects; this is how JSON representations of OData entity set resources are typically expressed, such as this list of books from our running app, at the location http://localhost:4004/catalog/Books, specifically conveyed in the value property here (which is a JSON array [...]):
{
"value": [
{
"ID": 201,
"title": "Wuthering Heights",
"stock": 12,
"author_ID": 101
},
{
"ID": 207,
"title": "Jane Eyre",
"stock": 11,
"author_ID": 107
},
{
"ID": 251,
"title": "The Raven",
"stock": 333,
"author_ID": 150
}
]
}
Of course, in JSON and in some programming languages, these arrays can contain elements of different types, but in this context of annotation value types, the child elements will all be the same (scalars, objects, etc).
For an example of a collection value type, we'll turn to the SAP UI vocabulary, and specifically the SelectionFields term, which has the following description: "Properties that might be relevant for filtering a collection of entities of this type". The term is described as having this type:
[PropertyPath]
The collection notation [...] is reflected in the XML based definition of the vocabulary thus:
<Term Name="SelectionFields" Type="Collection(Edm.PropertyPath)" Nullable="false" AppliesTo="EntityType">
<Annotation Term="UI.ThingPerspective" />
<Annotation Term="Core.Description" String="Properties that might be relevant for filtering a collection of entities of this type" />
</Term>
While the previous vocabularies we've examined recently have been OASIS standard vocabularies with namespaces such as Org.OData.Core.V1 and Org.OData.Capabilities.V1, this vocabulary from SAP has the namespace com.sap.vocabularies.UI.v1.
Again, note that this annotation term is itself annotated. But more importantly here note the term type is expressed as a Collection(...) of the type Edm.PropertyPath. This is the definitive evidence that the SelectionFields term has a value which is a collection.
Why don't we take the example of the SelectionFields term from in index.cds and apply it to our simple Categories entity:
service Northwind {
@UI.SelectionFields: [ ID, description ]
entity Categories {
key ID: Integer;
description: String;
}
}
When compiled to EDMX, this is what we get:
<?xml version="1.0" encoding="utf-8"?>
<edmx:Edmx Version="4.0" xmlns:edmx="http://docs.oasis-open.org/odata/ns/edmx">
<edmx:Reference Uri="https://sap.github.io/odata-vocabularies/vocabularies/UI.xml">
<edmx:Include Alias="UI" Namespace="com.sap.vocabularies.UI.v1"/>
</edmx:Reference>
<edmx:DataServices>
<Schema Namespace="Northwind" xmlns="http://docs.oasis-open.org/odata/ns/edm">
<EntityContainer Name="EntityContainer">
<EntitySet Name="Categories" EntityType="Northwind.Categories"/>
</EntityContainer>
<EntityType Name="Categories">
<Key>
<PropertyRef Name="ID"/>
</Key>
<Property Name="ID" Type="Edm.Int32" Nullable="false"/>
<Property Name="description" Type="Edm.String"/>
</EntityType>
<Annotations Target="Northwind.Categories">
<Annotation Term="UI.SelectionFields">
<Collection>
<PropertyPath>ID</PropertyPath>
<PropertyPath>description</PropertyPath>
</Collection>
</Annotation>
</Annotations>
</Schema>
</edmx:DataServices>
</edmx:Edmx>
The collection type is clearly comprehensible to us; even the name of the <PropertyPath> elements that are therein contained are not unfamiliar now (remember, the type of the SelectionFields was is described like this: [PropertyPath]). There's nothing within the <Annotations> element that is a mystery to us.
Expressing multiple annotations with @(...)
The examples so far have been single and separate. Using the Capabilities vocabulary's DeleteRestrictions term here, the Core vocabulary's Description term there, and the UI vocabulary's SelectionFields term yet somewhere else.
That's fine, and these can all be included together for an entity, as follows:
service Northwind {
@Core.Description: 'The general type of product'
@Capabilities.DeleteRestrictions.Deletable: false
@UI.SelectionFields: [ ID, title ]
entity Categories {
key ID: Integer;
description: String;
}
}
Often there's a need to use multiple annotations in the same vocabulary. And in order to avoid repeating the vocabulary name, the @(...) construct can be used, in conjunction with curly braces. It might help to illustrate this first by considering an alternative (albeit extreme) way of expressing the DeleteRestrictions annotation:
@(Capabilities: { DeleteRestrictions: { Deletable: false } } )
With extra whitespace, this looks like this:
@(
Capabilities: {
DeleteRestrictions: {
Deletable: false
}
}
)
The @(...) construct can also be used to group unrelated annotations too, if you wish.
Each "node" in the dotted hierarchy is exploded into a map (or object) of property and value pairs. Using this syntactical approach, it's easy to see the possibilities open up for expressing multiple terms in the same vocabulary. And this is exactly what's happening in index.cds, as we'll see.
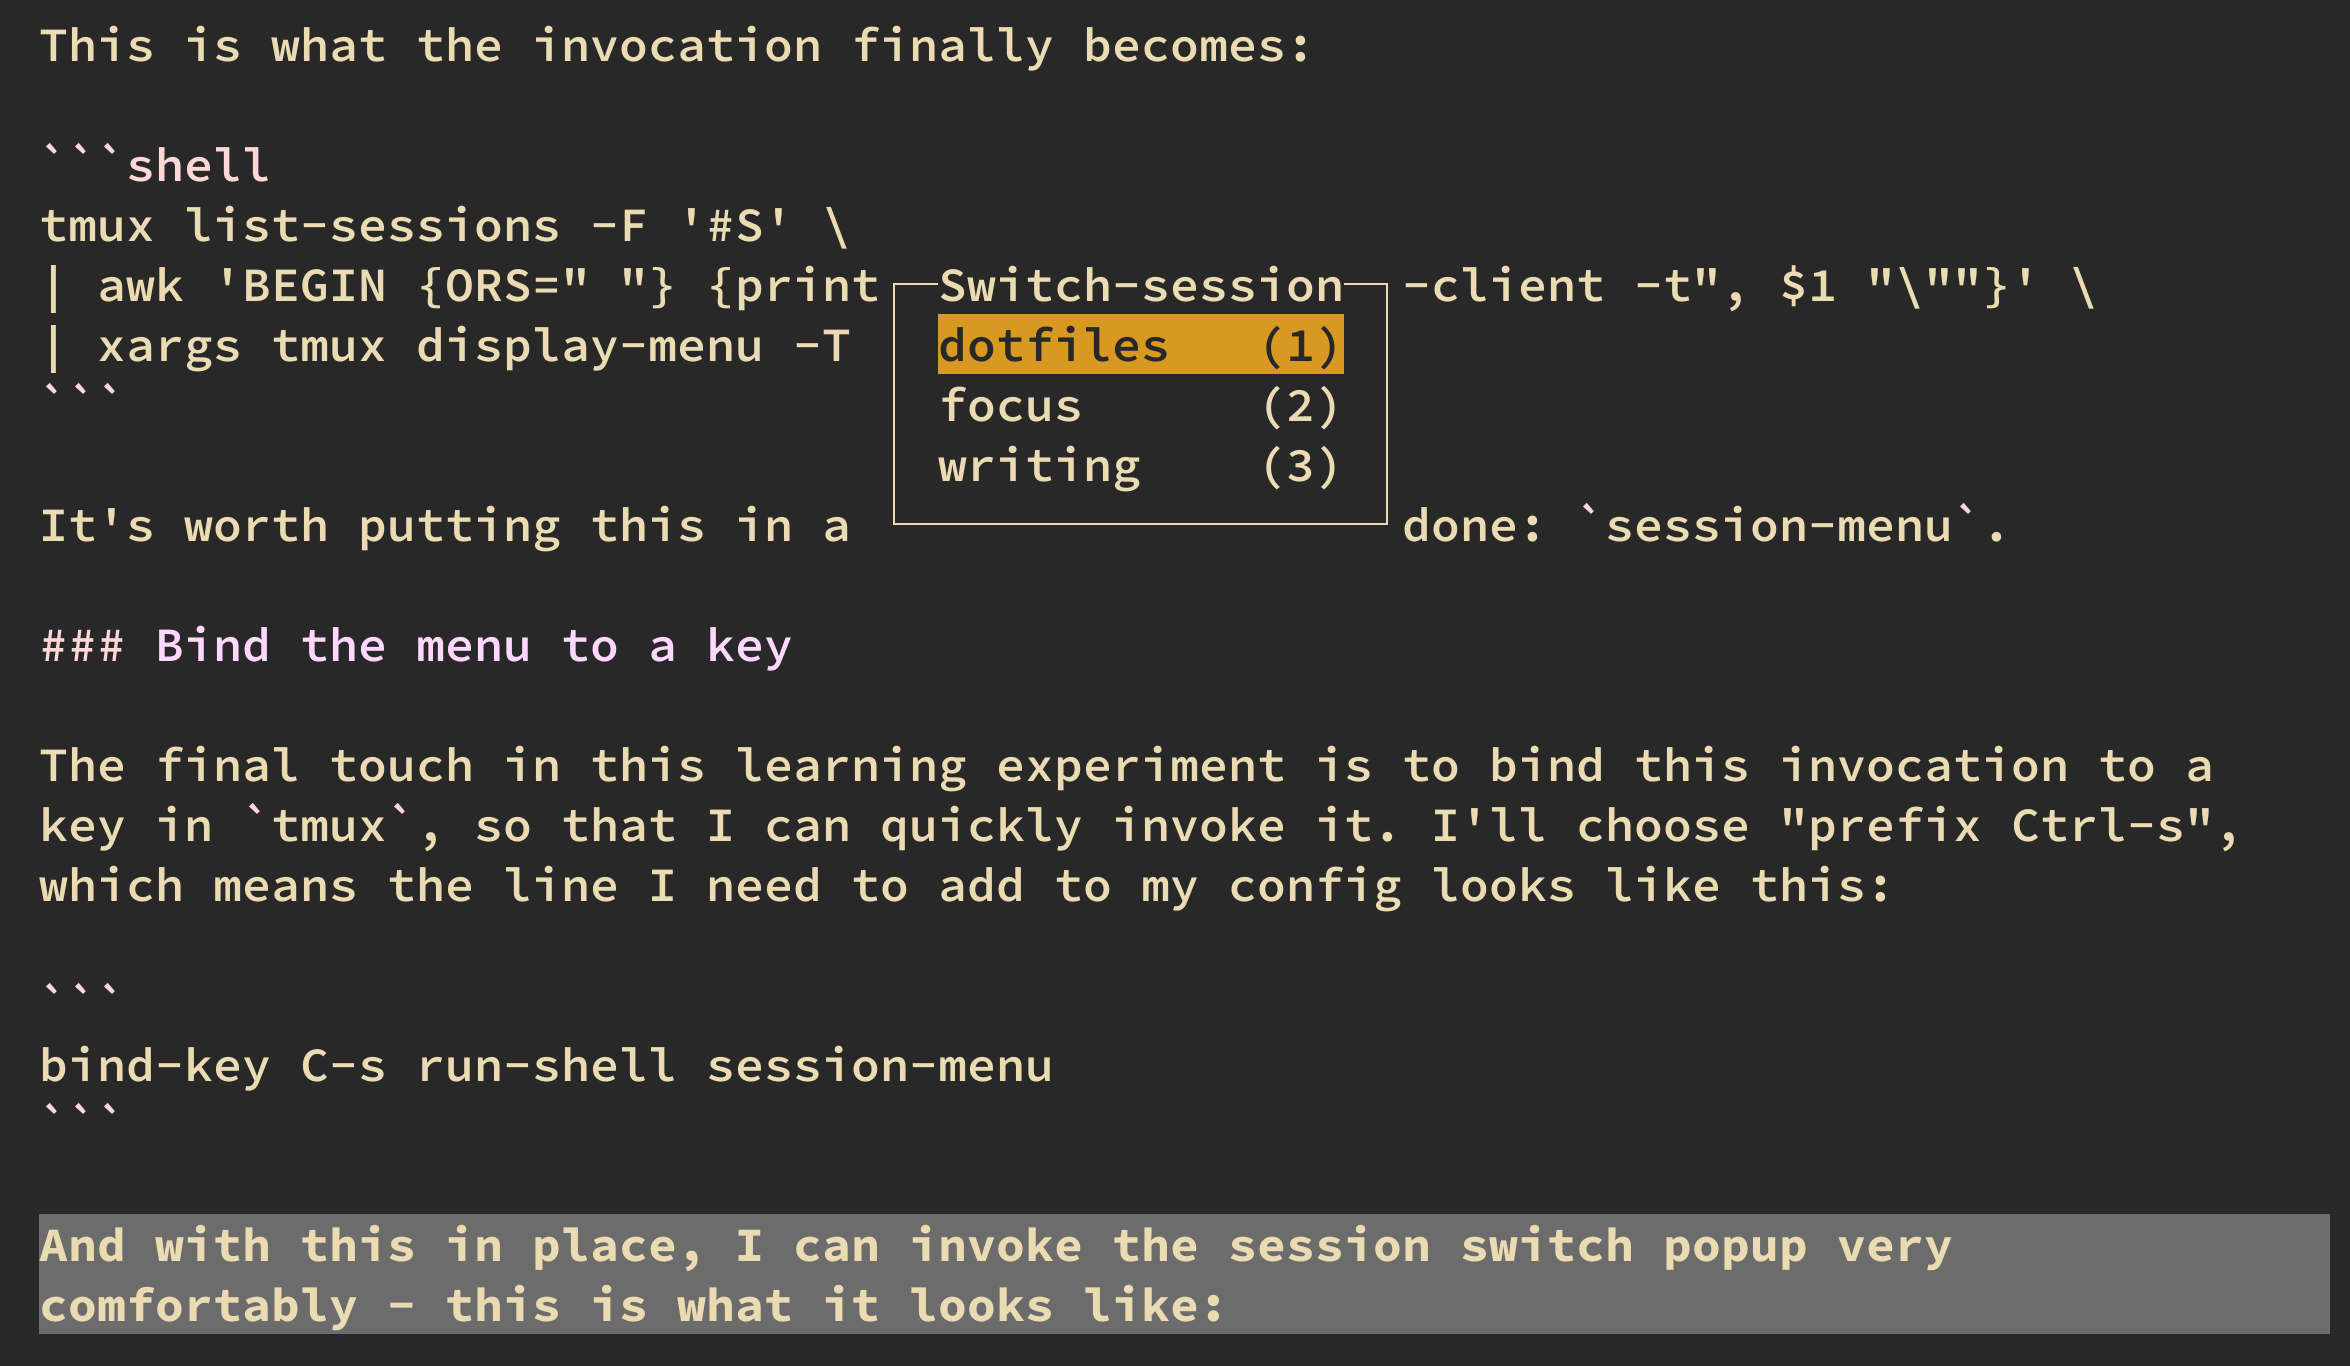
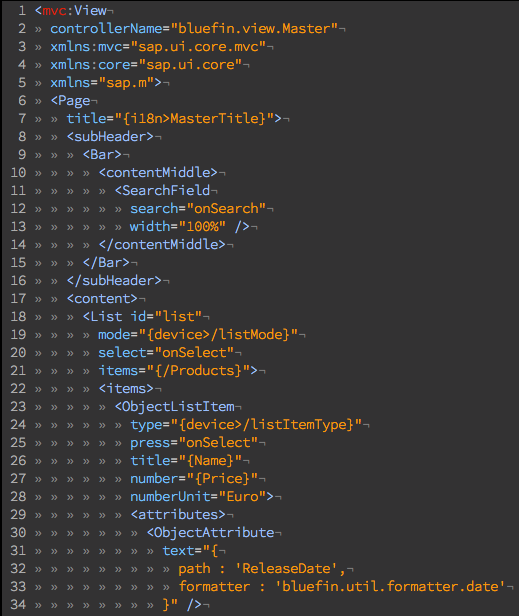
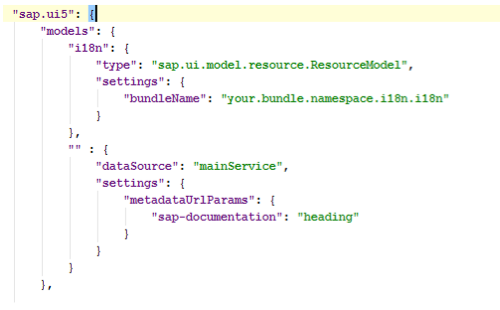
annotate CatalogService.Books with @(
UI: {
Identification: [ {Value: title} ],
SelectionFields: [ title ],
LineItem: [
{Value: ID},
{Value: title},
{Value: author.name},
{Value: author_ID},
{Value: stock}
],
HeaderInfo: {
TypeName: '{i18n>Book}',
TypeNamePlural: '{i18n>Books}',
Title: {Value: title},
Description: {Value: author.name}
}
}
);
Annotation vocabulary references
Before we leave this long but hopefully enlightening digression, there's one more thing to stare at in the annotation goodness that we find in the OData metadata documents, i.e. in the generated EDMX. For each of the primitive, record and collection examples, we've focused on the <Annotations> element in the XML. But there are elements earlier on that are also related.
This is the EDMX from the primitive value example earlier:
<?xml version="1.0" encoding="utf-8"?>
<edmx:Edmx Version="4.0" xmlns:edmx="http://docs.oasis-open.org/odata/ns/edmx">
<edmx:Reference Uri="https://oasis-tcs.github.io/odata-vocabularies/vocabularies/Org.OData.Core.V1.xml">
<edmx:Include Alias="Core" Namespace="Org.OData.Core.V1"/>
</edmx:Reference>
<edmx:DataServices>
<Schema Namespace="Northwind" xmlns="http://docs.oasis-open.org/odata/ns/edm">
<EntityContainer Name="EntityContainer">
<EntitySet Name="Categories" EntityType="Northwind.Categories"/>
</EntityContainer>
<EntityType Name="Categories">
<Key>
<PropertyRef Name="ID"/>
</Key>
<Property Name="ID" Type="Edm.Int32" Nullable="false"/>
<Property Name="description" Type="Edm.String"/>
</EntityType>
<Annotations Target="Northwind.Categories">
<Annotation Term="Core.description" String="The general type of product"/>
</Annotations>
</Schema>
</edmx:DataServices>
</edmx:Edmx>
The annotation itself is <Annotation Term="Core.description" String="The general type of product"/>.
In the EDMX, before the <DataServices> section (which contains the <Schema> which in turn contains the definitions of the annotations, entity sets, entity types, complex types and so on), there is a <edmx:Reference> to the Core vocabulary namespace.
<edmx:Reference Uri="https://oasis-tcs.github.io/odata-vocabularies/vocabularies/Org.OData.Core.V1.xml">
<edmx:Include Alias="Core" Namespace="Org.OData.Core.V1"/>
</edmx:Reference>
This qualifies the Core vocabulary prefixes on the terms used, and includes the relevant vocabulary namespace Org.OData.Core.V1 and also the canonical URL where the definition can be found, i.e. https://oasis-tcs.github.io/odata-vocabularies/vocabularies/Org.OData.Core.V1.xml.
Now you're aware of these, you'll start to notice their existence, to pick them out of the XML noise at the start of the metadata documents.
Interpreting the detailed annotations
OK, it's time to revisit the annotations in index.cds, examine them one by one, and make sure we understand what's generated in the EDMX, and why. Here are the annotations again:
annotate CatalogService.Books with @(
UI: {
Identification: [ {Value: title} ],
SelectionFields: [ title ],
LineItem: [
{Value: ID},
{Value: title},
{Value: author.name},
{Value: author_ID},
{Value: stock}
],
HeaderInfo: {
TypeName: '{i18n>Book}',
TypeNamePlural: '{i18n>Books}',
Title: {Value: title},
Description: {Value: author.name}
}
}
);
First, note that this is all of the contents of the srv/index.cds file. There are no entity type definitions in here. This is an example of keeping the annotations separate; not only via the annotate directive, but also in a different file.
The entity type being annotated is Books, within the CatalogService service, i.e. this reference here in srv/service.cds:
using my.bookshop as my from '../db/schema';
service CatalogService {
entity Books as projection on my.Books;
...
}
The @(...) construct is being used to group annotations together. In fact, staring at the structure within, we can see that all of the annotations here are terms from the UI vocabulary, along with their types (from the UI Vocabulary resource):
| Vocabulary |
Term |
Type |
UI |
Identification |
[DataFieldAbstract] |
UI |
SelectionFields |
[PropertyPath] |
UI |
LineItem |
[DataFieldAbstract] |
UI |
HeaderInfo |
HeaderInfoType |
Looking at the DataFieldAbstract type
Both the Identification and LineItem terms have the same type, which is a collection of DataFieldAbstract building blocks. This building block is an abstract type (given its name, that's not a surprise to us) which has concrete instances. One concrete instance of this abstract type is DataField which is a record with five properties:
| Property |
Type |
Description |
Label |
String |
A short, human-readable text suitable for labels and captions in UIs |
Criticality |
CriticalityType |
Criticality of the data field value |
CriticalityRepresentation |
CriticalityRepresentationType |
Decides if criticality is visualized in addition by means of an icon |
IconUrl |
URL |
Optional icon |
Value |
Untyped |
The data field's value |
The Value term is the only one that belongs to this concrete DataField type, the rest are from the DataFieldAbstract type. You can see this by examining the canonical machine-readable XML definition of the type, which looks like this:
<ComplexType Name="DataField" BaseType="UI.DataFieldAbstract">
<Annotation Term="Core.Description" String="A piece of data" />
<Property Name="Value" Type="Edm.Untyped" Nullable="false">
<Annotation Term="Core.Description" String="The data field's value" />
<Annotation Term="Validation.DerivedTypeConstraint">
<Collection>
<String>Edm.PrimitiveType</String>
<String>Collection(Edm.Binary)</String>
<String>Collection(Edm.Boolean)</String>
<String>Collection(Edm.Byte)</String>
<String>Collection(Edm.Date)</String>
<String>Collection(Edm.DateTimeOffset)</String>
<String>Collection(Edm.Decimal)</String>
<String>Collection(Edm.Double)</String>
<String>Collection(Edm.Duration)</String>
<String>Collection(Edm.Guid)</String>
<String>Collection(Edm.Int16)</String>
<String>Collection(Edm.Int32)</String>
<String>Collection(Edm.Int64)</String>
<String>Collection(Edm.SByte)</String>
<String>Collection(Edm.Single)</String>
<String>Collection(Edm.String)</String>
<String>Collection(Edm.TimeOfDay)</String>
</Collection>
</Annotation>
<Annotation Term="Core.IsLanguageDependent" />
</Property>
</ComplexType>
There's only a single Property defined (which is Value), with the rest coming from DataFieldAbstract which is referenced via the BaseType attribute in the <ComplexType> element.
If you're wondering why the type is DataFieldAbstract and not DataField, see this question and answer.
The Records section on the CAP documentation on OData annotations highlights this DataFieldAbstract type, pointing out its prominence and the behaviour of the compiler for annotations defined with terms that have this type; the generated EDMX will default to the concrete DataField type (i.e. <Record Type="UI.DataField">...</Record>) unless another is specified explicitly via the special $Type property.
The UI.Identification term
Now we know about the DataFieldAbstract type and its concrete derivation DataField that's being used here, we can more comfortably interpret the appearance of the two terms in the CDS annotations:
annotate CatalogService.Books with @(
UI: {
Identification: [ {Value: title} ],
LineItem: [
{Value: ID},
{Value: title},
{Value: author.name},
{Value: author_ID},
{Value: stock}
]
}
);
Every part of each of these annotations is now within our grasp. First, consider the syntax. This part:
@(
UI: {
Identification: [ {Value: title} ]
}
);
can be compressed thus:
@UI.Identfication: [ { Value: title } ]
It can't be compressed further; if we were to specify the following:
@UI.Identfication.Value: title
then the compiler would emit this:
[WARNING] In annotation translation: found complex type, but expected type 'Collection(UI.DataFieldAbstract)', target: Northwind.Categories, annotation: UI.Identification
because the type is a Collection of complex types (records), not a single complex type.
Anyway, what's being expressed here is that the entity type is to be "identified" by the title property (of the Books entity type).
You can see the EDMX result of this annotation in the corresponding XML in the service's metadata document.
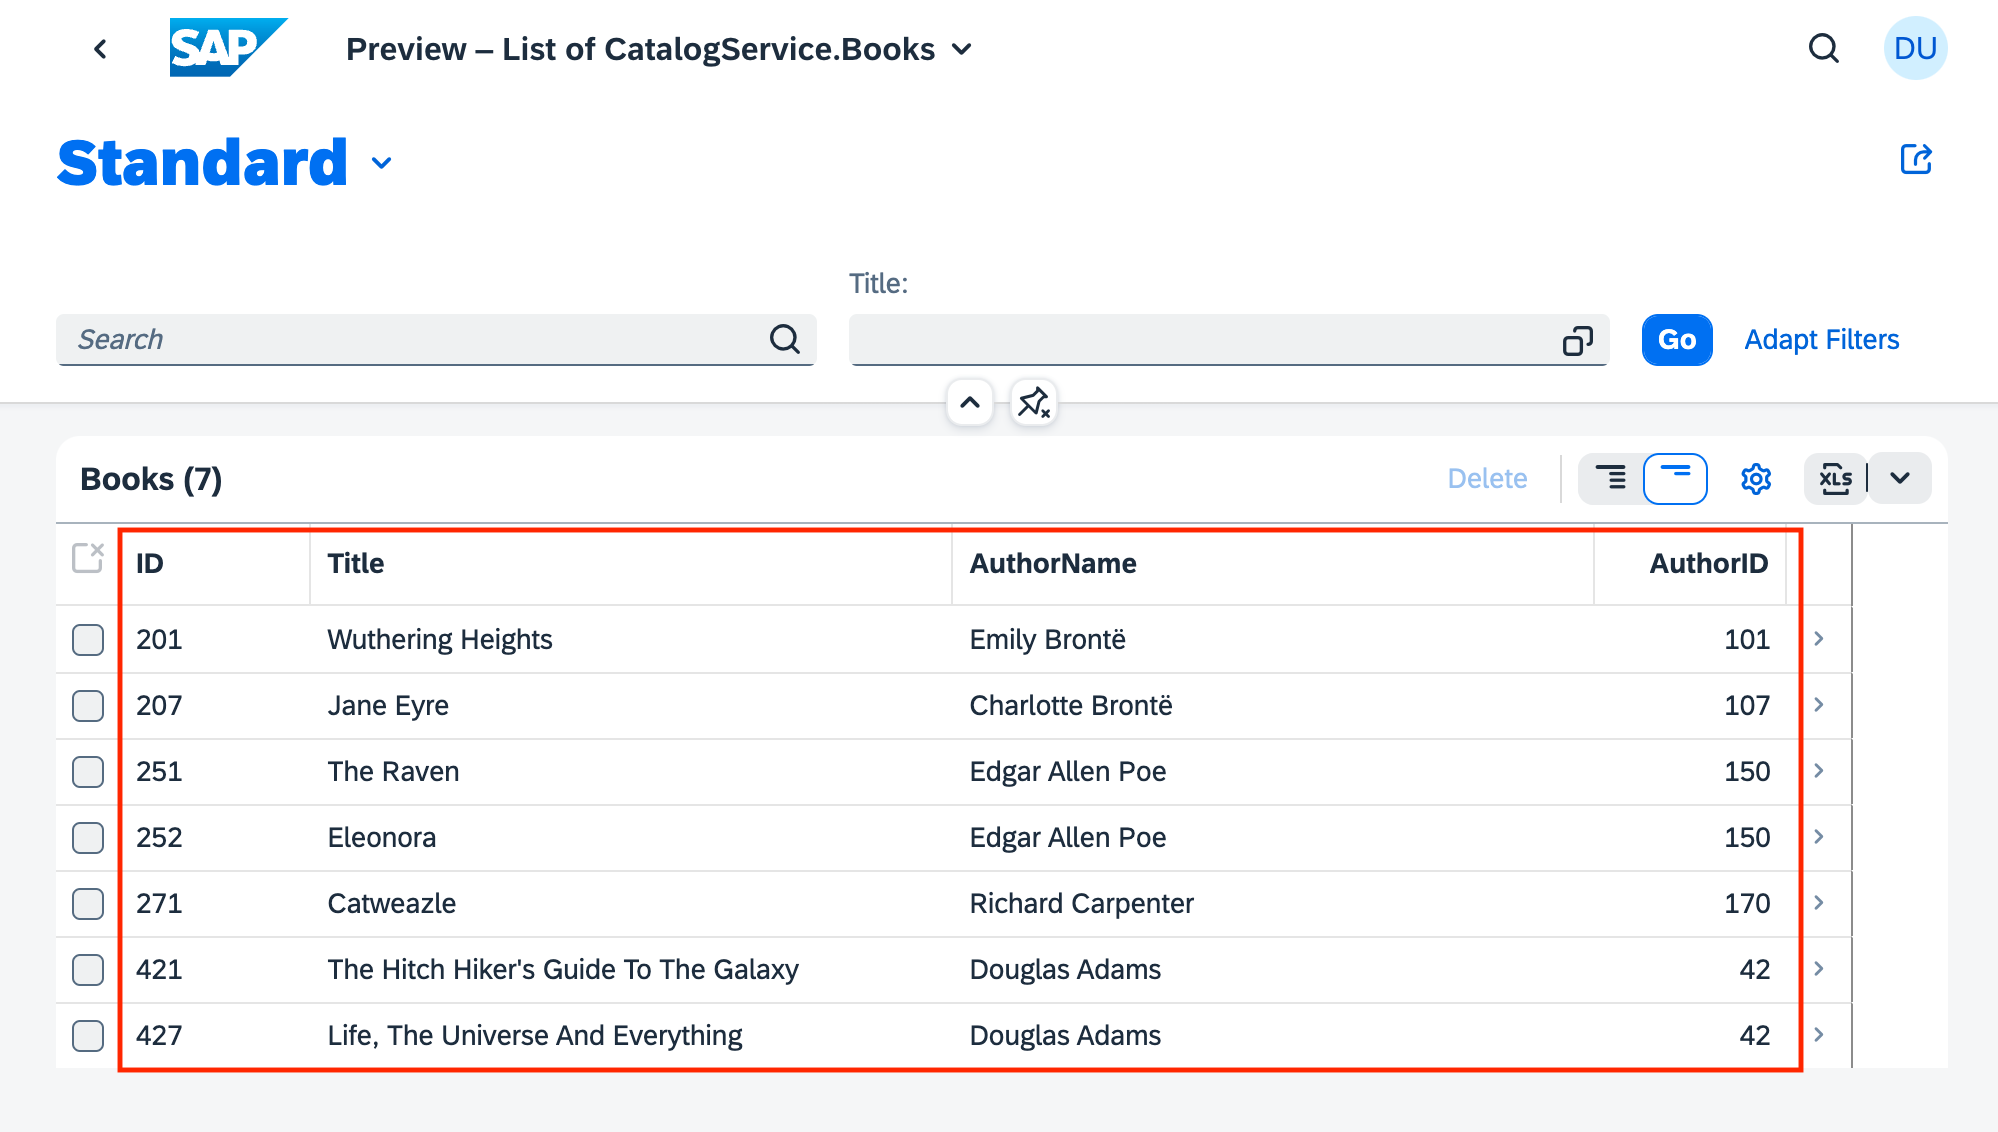
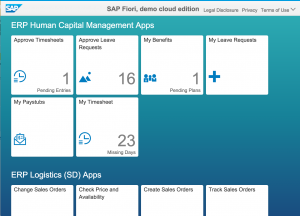
The UI.LineItem term
The LineItem term is very similar, except that there is more than one record given as the value. Again, the type of the term is [DataFieldAbstract], and what's being used is a collection of concrete DataField instances, with a value specified for their Value property. These values that are specified (ID, title, and so on) are properties in the model.
Note in passing that one of these model properties (author.name) is via the Books entity type relationship with the Authors entity type, and another (author_ID) is a generated property from the use of the managed association to create that relationship.
You can see the EDMX result of this annotation in the corresponding XML in the service's metadata document.
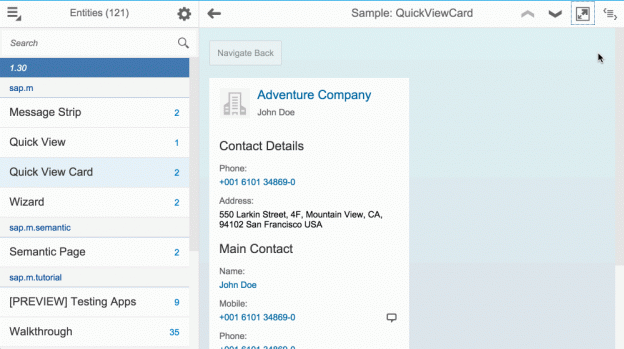
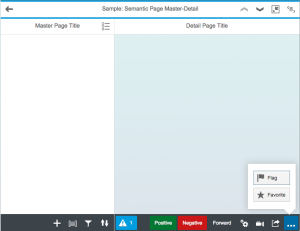
The Fiori preview app shows us an example of how this annotation is used, to determine the columns in the list of books:
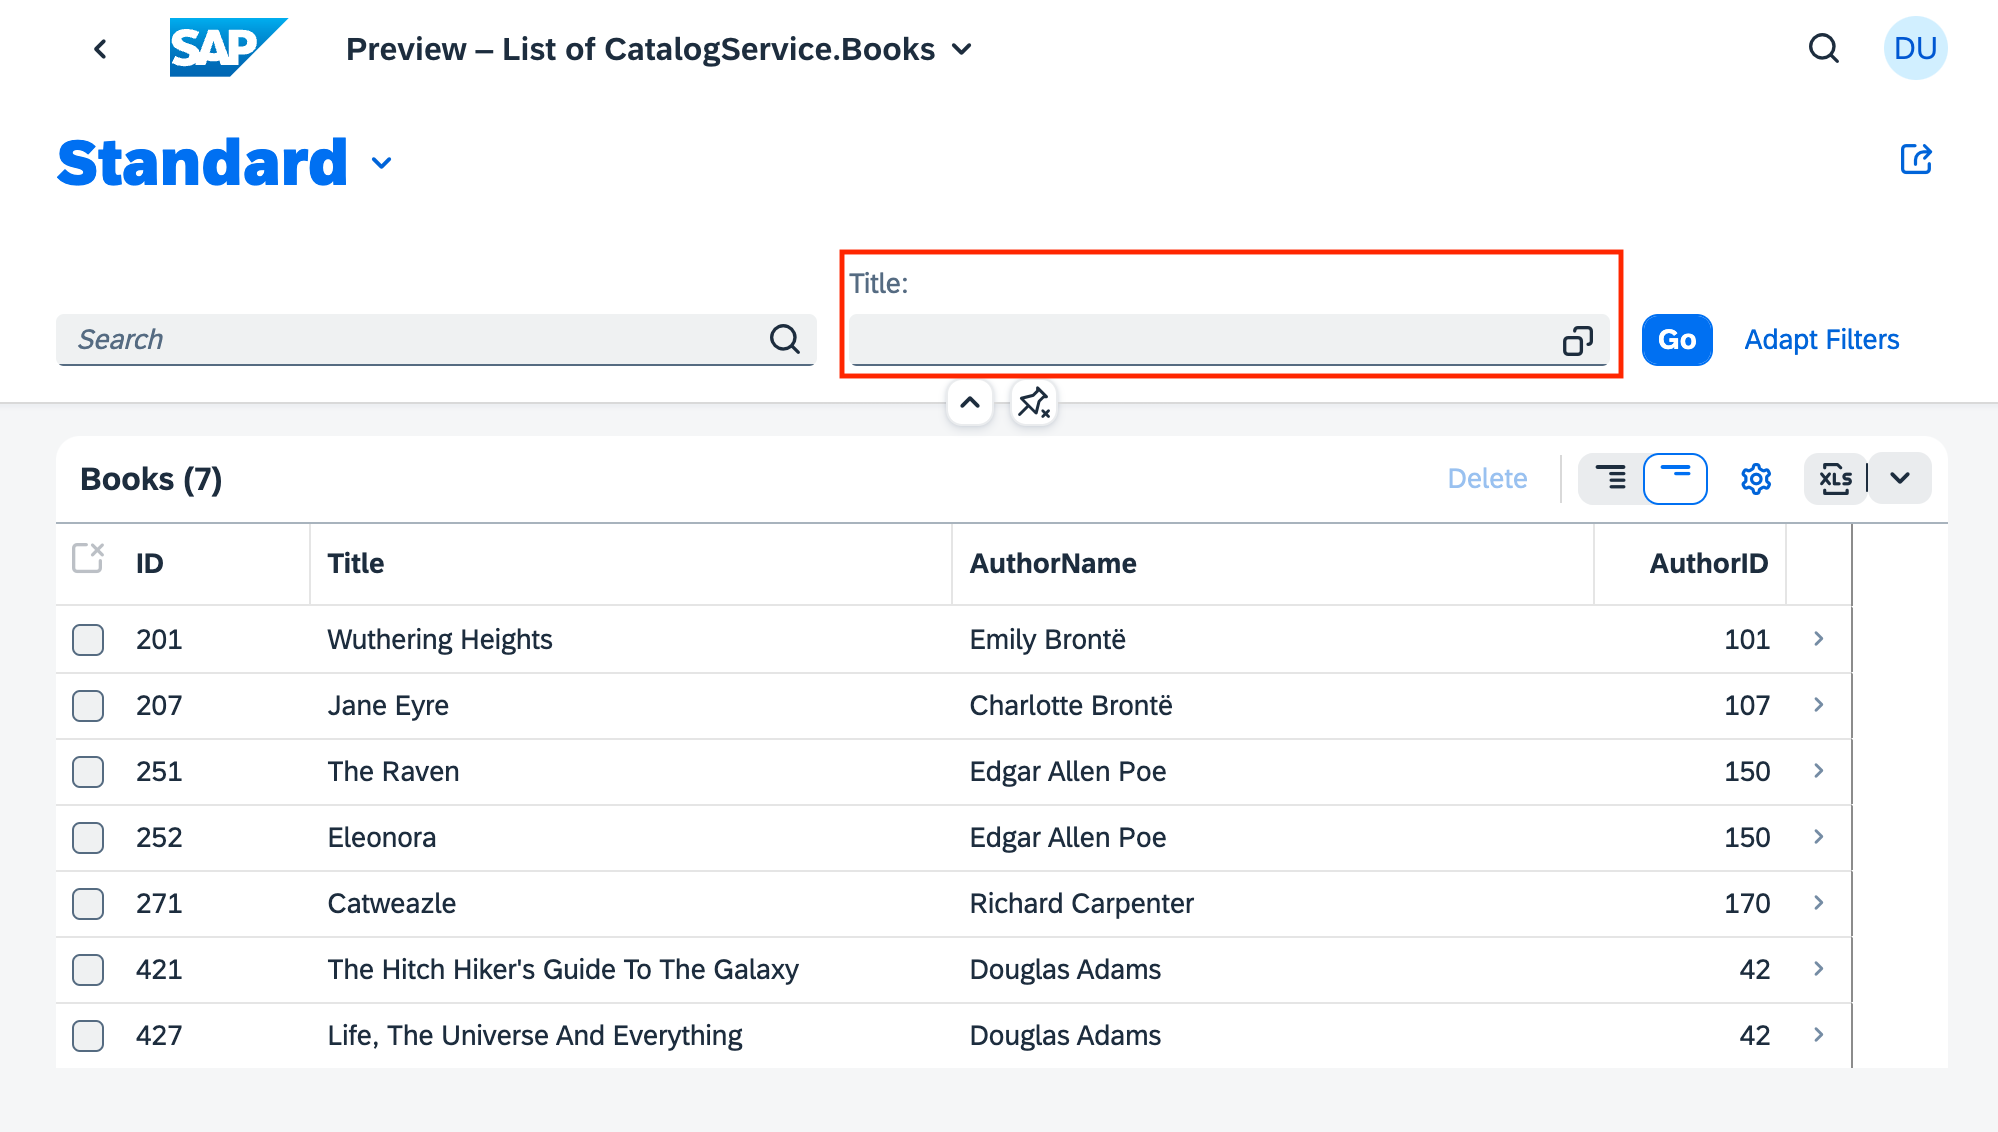
The UI.SelectionFields term
This has been covered earlier, and is (in this instance) a collection of (a single) primitive value, the title property path. The annotation appears like this:
annotate CatalogService.Books with @(
UI: {
SelectionFields: [ title ]
}
);
but the annotation itself could be also be compressed like this:
annotate CatalogService.Books with @(
UI.SelectionFields: [ title ]
);
You can see the EDMX result of this annotation in the corresponding XML in the service's metadata document.
The Fiori preview app shows us an example of how this annotation is used, to determine which field(s) are exposed to allow filtering of books in the list:
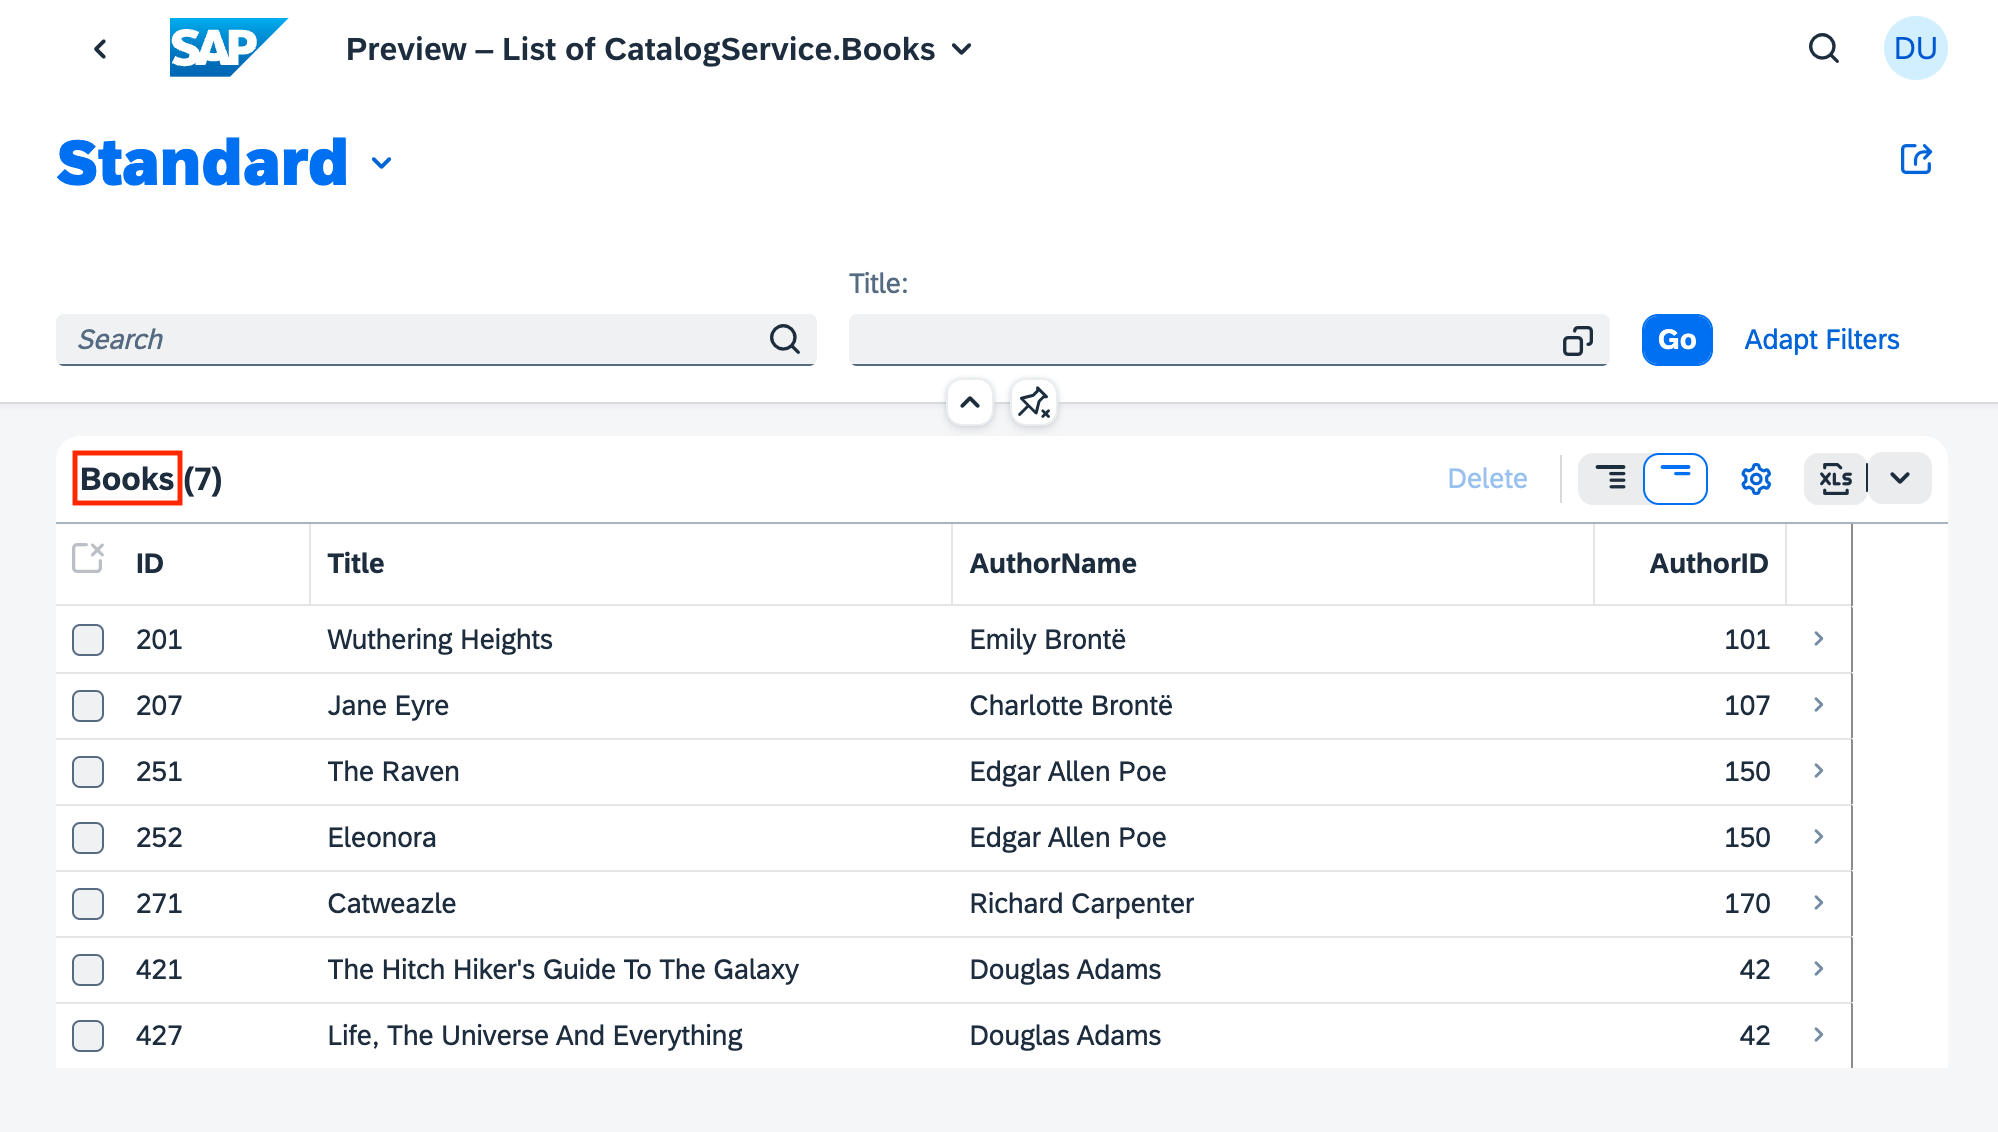
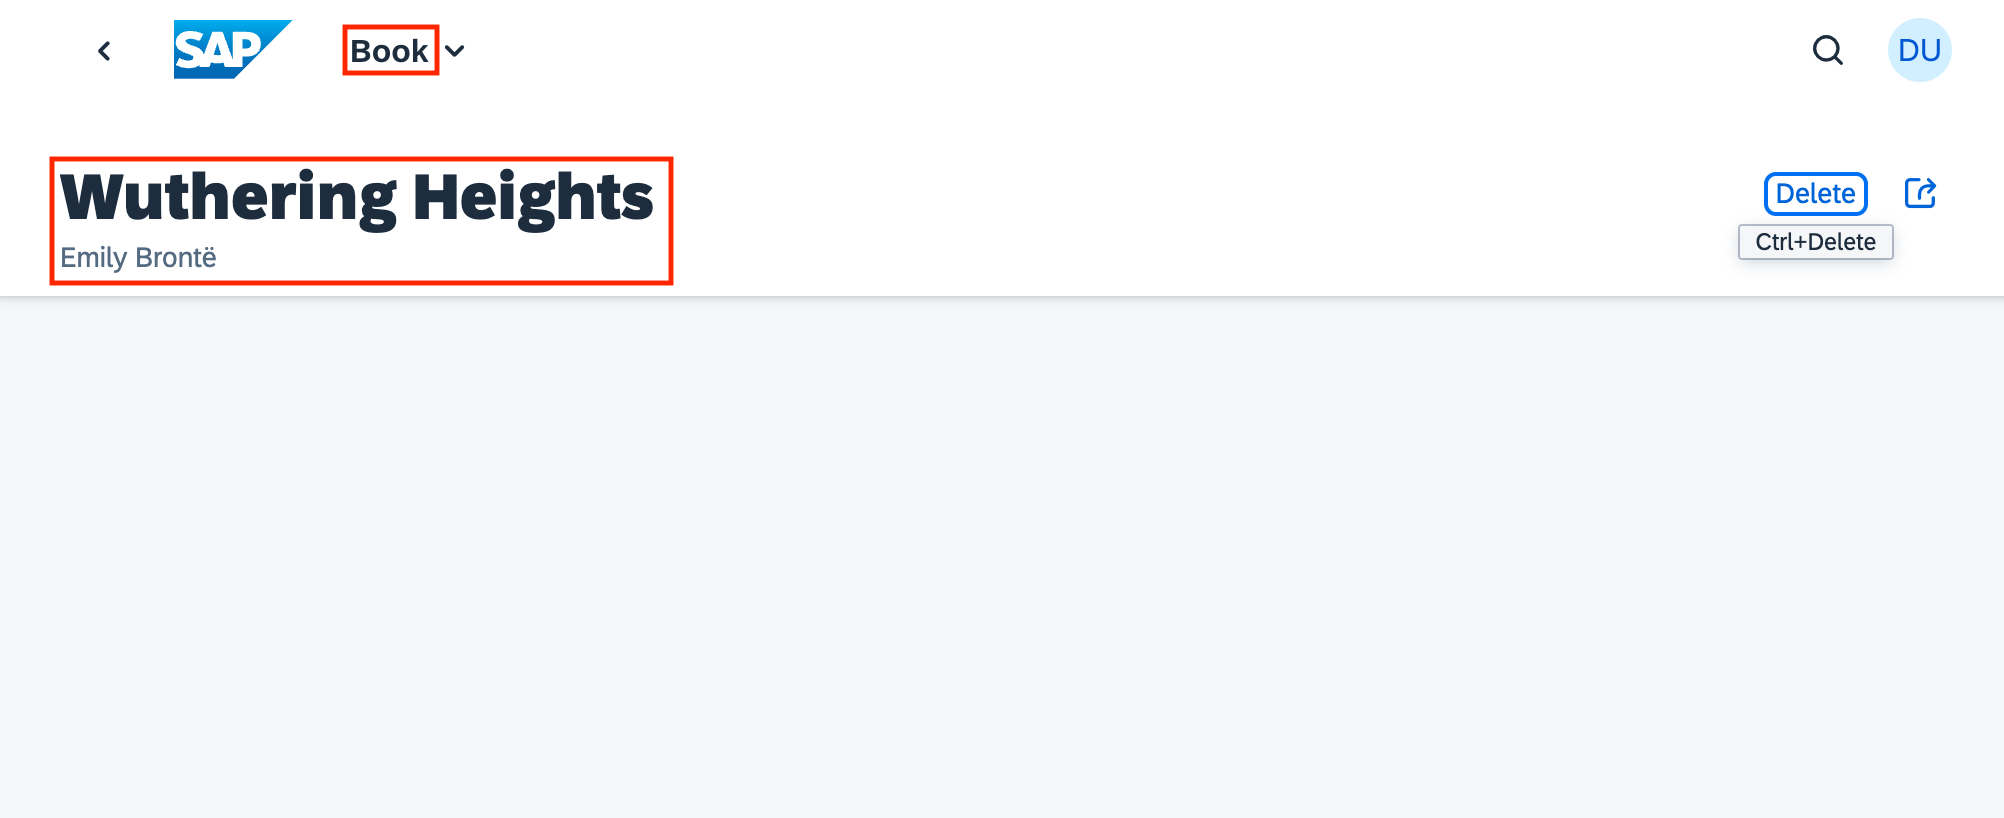
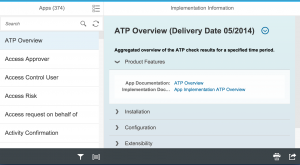
The UI.HeaderInfo term
Here's what this term looks like in isolation:
annotate CatalogService.Books with @(
UI: {
HeaderInfo: {
TypeName: '{i18n>Book}',
TypeNamePlural: '{i18n>Books}',
Title: {Value: title},
Description: {Value: author.name}
}
}
);
While not so much compressed, this could have equally been expressed as follows:
annotate CatalogService.Books with @(
UI.HeaderInfo.TypeName: '{i18n>Book}',
UI.HeaderInfo.TypeNamePlural: '{i18n>Books}',
UI.HeaderInfo.Title.Value: title,
UI.HeaderInfo.Description.Value: author.name
);
Rewriting this HeaderInfo annotation term like this draws our attention to the subtle but significant difference in the curly braces used here.
For the TypeName and TypeNamePlural properties of the HeaderInfoType type (see the HeaderInfoType reference that describes the HeaderInfo term, the values are defined with the String type.
And the string values are both references to internationalized string data, using the standard UI5 and CDS syntax for this:
{modelname>property}
In other words, the curly braces here are part of the syntax for specifying a model property in CDS. Inside (single-quoted) strings.
But the values for the Title and Description properties of the HeaderInfoType type are not strings, but records. Complex types, in other words, via our friend DataFieldAbstract. The description of these two properties in the HeaderInfoType reference states: "This can be a DataField and any of its children, or a DataFieldForAnnotation targeting ConnectedFields.". And just like before, the concrete type used here is DataField, with a Value property.
In other words, the curly braces in these two properties denote the DataField type's record structure that contains the Value property.
You can see the EDMX result of this annotation in the corresponding XML in the service's metadata document.
The Fiori preview app shows us an example of how this annotation is used, in two places: the plural of "Books" used in the list, and the singular "Book" used, plus the book title and author name for the header section of the detail page for a selected book:
Examining the OData annotations in EDMX
With all this knowledge under your belt, the last thing to do in this journey of discovery is to revisit the OData service's metadata document (for CatalogService, rather than Stats) and stare at the EDMX, in particular, the annotation related XML. It should now be somewhat clearer, and hopefully you'll be able to read it more comfortably and with more confidence.
You should also more easily recognise the names of the XML elements in use, as they directly represent concepts we've looked at: Collection, Record, PropertyValue, and so on.
Assuming the service is still running, open up http://localhost:4004/catalog/$metadata, take a deep breath, and dive in. The actual document content is at the end. Here are some reading notes on it.
Namespace references
At the top we see references to the namespaces corresponding to the annotation vocabularies used:
<edmx:Reference Uri="https://sap.github.io/odata-vocabularies/vocabularies/Common.xml">
<edmx:Include Alias="Common" Namespace="com.sap.vocabularies.Common.v1"/>
</edmx:Reference>
<edmx:Reference Uri="https://oasis-tcs.github.io/odata-vocabularies/vocabularies/Org.OData.Core.V1.xml">
<edmx:Include Alias="Core" Namespace="Org.OData.Core.V1"/>
</edmx:Reference>
<edmx:Reference Uri="https://sap.github.io/odata-vocabularies/vocabularies/UI.xml">
<edmx:Include Alias="UI" Namespace="com.sap.vocabularies.UI.v1"/>
</edmx:Reference>
Annotation targets
The annotations themselves appear within the <Schema> element, within multiple <Annotations> elements. There are multiple elements because it's at this <Annotations> element level that the target of the annotation(s) is specified, and there are multiple annotation targets.
Some targets are entity types, such as Books:
<Annotations Target="CatalogService.Books">
...
</Annotations>
and Countries:
<Annotations Target="CatalogService.Countries">
...
</Annotations>
Other targets are properties, such as the ID property in Books:
<Annotations Target="CatalogService.Books/ID">
...
</Annotations>
UI.Identification annotation
The annotation XML for this, applied to the Books entity set target, is as follows:
<Annotation Term="UI.Identification">
<Collection>
<Record Type="UI.DataField">
<PropertyValue Property="Value" Path="title"/>
</Record>
</Collection>
</Annotation>
UI.SelectionFields annotation
The annotation XML for this, applied to the Books entity set target, is as follows:
<Annotation Term="UI.SelectionFields">
<Collection>
<PropertyPath>title</PropertyPath>
</Collection>
</Annotation>
UI.LineItem annotation
The annotation XML for this, applied to the Books entity set target, is as follows:
<Annotation Term="UI.LineItem">
<Collection>
<Record Type="UI.DataField">
<PropertyValue Property="Value" Path="ID"/>
</Record>
<Record Type="UI.DataField">
<PropertyValue Property="Value" Path="title"/>
</Record>
<Record Type="UI.DataField">
<PropertyValue Property="Value" Path="author/name"/>
</Record>
<Record Type="UI.DataField">
<PropertyValue Property="Value" Path="author_ID"/>
</Record>
<Record Type="UI.DataField">
<PropertyValue Property="Value" Path="stock"/>
</Record>
</Collection>
</Annotation>
Note that this XML is slighly larger as there are multiple records in the collection
UI.HeaderInfo annotation
The annotation XML for this, applied to the Books entity set target, is as follows:
<Annotation Term="UI.HeaderInfo">
<Record Type="UI.HeaderInfoType">
<PropertyValue Property="TypeName" String="Book"/>
<PropertyValue Property="TypeNamePlural" String="Books"/>
<PropertyValue Property="Title">
<Record Type="UI.DataField">
<PropertyValue Property="Value" Path="title"/>
</Record>
</PropertyValue>
<PropertyValue Property="Description">
<Record Type="UI.DataField">
<PropertyValue Property="Value" Path="author/name"/>
</Record>
</PropertyValue>
</Record>
</Annotation>
Here we can more plainly see the intermix of primitive values for TypeName and TypeNamePlural and records (complex types) for Title and Description.
The CatalogService's metadata
Here's the entire document, in all its glory.
<?xml version="1.0" encoding="utf-8"?>
<edmx:Edmx Version="4.0" xmlns:edmx="http://docs.oasis-open.org/odata/ns/edmx">
<edmx:Reference Uri="https://sap.github.io/odata-vocabularies/vocabularies/Common.xml">
<edmx:Include Alias="Common" Namespace="com.sap.vocabularies.Common.v1"/>
</edmx:Reference>
<edmx:Reference Uri="https://oasis-tcs.github.io/odata-vocabularies/vocabularies/Org.OData.Core.V1.xml">
<edmx:Include Alias="Core" Namespace="Org.OData.Core.V1"/>
</edmx:Reference>
<edmx:Reference Uri="https://sap.github.io/odata-vocabularies/vocabularies/UI.xml">
<edmx:Include Alias="UI" Namespace="com.sap.vocabularies.UI.v1"/>
</edmx:Reference>
<edmx:DataServices>
<Schema Namespace="CatalogService" xmlns="http://docs.oasis-open.org/odata/ns/edm">
<EntityContainer Name="EntityContainer">
<EntitySet Name="Books" EntityType="CatalogService.Books">
<NavigationPropertyBinding Path="author" Target="Authors"/>
</EntitySet>
<EntitySet Name="Authors" EntityType="CatalogService.Authors">
<NavigationPropertyBinding Path="books" Target="Books"/>
</EntitySet>
<EntitySet Name="Orders" EntityType="CatalogService.Orders">
<NavigationPropertyBinding Path="book" Target="Books"/>
<NavigationPropertyBinding Path="country" Target="Countries"/>
</EntitySet>
<EntitySet Name="Countries" EntityType="CatalogService.Countries">
<NavigationPropertyBinding Path="texts" Target="Countries_texts"/>
<NavigationPropertyBinding Path="localized" Target="Countries_texts"/>
</EntitySet>
<EntitySet Name="Countries_texts" EntityType="CatalogService.Countries_texts"/>
</EntityContainer>
<EntityType Name="Books">
<Key>
<PropertyRef Name="ID"/>
</Key>
<Property Name="ID" Type="Edm.Int32" Nullable="false"/>
<Property Name="title" Type="Edm.String"/>
<Property Name="stock" Type="Edm.Int32"/>
<NavigationProperty Name="author" Type="CatalogService.Authors" Partner="books">
<ReferentialConstraint Property="author_ID" ReferencedProperty="ID"/>
</NavigationProperty>
<Property Name="author_ID" Type="Edm.Int32"/>
</EntityType>
<EntityType Name="Authors">
<Key>
<PropertyRef Name="ID"/>
</Key>
<Property Name="ID" Type="Edm.Int32" Nullable="false"/>
<Property Name="name" Type="Edm.String"/>
<NavigationProperty Name="books" Type="Collection(CatalogService.Books)" Partner="author"/>
</EntityType>
<EntityType Name="Orders">
<Key>
<PropertyRef Name="ID"/>
</Key>
<Property Name="ID" Type="Edm.Guid" Nullable="false"/>
<Property Name="createdAt" Type="Edm.DateTimeOffset" Precision="7"/>
<Property Name="createdBy" Type="Edm.String" MaxLength="255"/>
<Property Name="modifiedAt" Type="Edm.DateTimeOffset" Precision="7"/>
<Property Name="modifiedBy" Type="Edm.String" MaxLength="255"/>
<NavigationProperty Name="book" Type="CatalogService.Books">
<ReferentialConstraint Property="book_ID" ReferencedProperty="ID"/>
</NavigationProperty>
<Property Name="book_ID" Type="Edm.Int32"/>
<Property Name="quantity" Type="Edm.Int32"/>
<NavigationProperty Name="country" Type="CatalogService.Countries">
<ReferentialConstraint Property="country_code" ReferencedProperty="code"/>
</NavigationProperty>
<Property Name="country_code" Type="Edm.String" MaxLength="3"/>
</EntityType>
<EntityType Name="Countries">
<Key>
<PropertyRef Name="code"/>
</Key>
<Property Name="name" Type="Edm.String" MaxLength="255"/>
<Property Name="descr" Type="Edm.String" MaxLength="1000"/>
<Property Name="code" Type="Edm.String" MaxLength="3" Nullable="false"/>
<NavigationProperty Name="texts" Type="Collection(CatalogService.Countries_texts)">
<OnDelete Action="Cascade"/>
</NavigationProperty>
<NavigationProperty Name="localized" Type="CatalogService.Countries_texts">
<ReferentialConstraint Property="code" ReferencedProperty="code"/>
</NavigationProperty>
</EntityType>
<EntityType Name="Countries_texts">
<Key>
<PropertyRef Name="locale"/>
<PropertyRef Name="code"/>
</Key>
<Property Name="locale" Type="Edm.String" MaxLength="14" Nullable="false"/>
<Property Name="name" Type="Edm.String" MaxLength="255"/>
<Property Name="descr" Type="Edm.String" MaxLength="1000"/>
<Property Name="code" Type="Edm.String" MaxLength="3" Nullable="false"/>
</EntityType>
<Annotations Target="CatalogService.Books">
<Annotation Term="UI.Identification">
<Collection>
<Record Type="UI.DataField">
<PropertyValue Property="Value" Path="title"/>
</Record>
</Collection>
</Annotation>
<Annotation Term="UI.SelectionFields">
<Collection>
<PropertyPath>title</PropertyPath>
</Collection>
</Annotation>
<Annotation Term="UI.LineItem">
<Collection>
<Record Type="UI.DataField">
<PropertyValue Property="Value" Path="ID"/>
</Record>
<Record Type="UI.DataField">
<PropertyValue Property="Value" Path="title"/>
</Record>
<Record Type="UI.DataField">
<PropertyValue Property="Value" Path="author/name"/>
</Record>
<Record Type="UI.DataField">
<PropertyValue Property="Value" Path="author_ID"/>
</Record>
<Record Type="UI.DataField">
<PropertyValue Property="Value" Path="stock"/>
</Record>
</Collection>
</Annotation>
<Annotation Term="UI.HeaderInfo">
<Record Type="UI.HeaderInfoType">
<PropertyValue Property="TypeName" String="Book"/>
<PropertyValue Property="TypeNamePlural" String="Books"/>
<PropertyValue Property="Title">
<Record Type="UI.DataField">
<PropertyValue Property="Value" Path="title"/>
</Record>
</PropertyValue>
<PropertyValue Property="Description">
<Record Type="UI.DataField">
<PropertyValue Property="Value" Path="author/name"/>
</Record>
</PropertyValue>
</Record>
</Annotation>
</Annotations>
<Annotations Target="CatalogService.Books/ID">
<Annotation Term="UI.HiddenFilter" Bool="true"/>
<Annotation Term="Common.Label" String="ID"/>
</Annotations>
<Annotations Target="CatalogService.Books/title">
<Annotation Term="Common.Label" String="Title"/>
</Annotations>
<Annotations Target="CatalogService.Books/stock">
<Annotation Term="Common.Label" String="Stock"/>
</Annotations>
<Annotations Target="CatalogService.Books/author">
<Annotation Term="Common.Label" String="AuthorID"/>
</Annotations>
<Annotations Target="CatalogService.Books/author_ID">
<Annotation Term="Common.Label" String="AuthorID"/>
</Annotations>
<Annotations Target="CatalogService.Authors/ID">
<Annotation Term="UI.HiddenFilter" Bool="true"/>
<Annotation Term="Common.Label" String="ID"/>
</Annotations>
<Annotations Target="CatalogService.Authors/name">
<Annotation Term="Common.Label" String="AuthorName"/>
</Annotations>
<Annotations Target="CatalogService.Orders/createdAt">
<Annotation Term="UI.HiddenFilter" Bool="true"/>
<Annotation Term="Core.Immutable" Bool="true"/>
<Annotation Term="Core.Computed" Bool="true"/>
<Annotation Term="Common.Label" String="Created On"/>
</Annotations>
<Annotations Target="CatalogService.Orders/createdBy">
<Annotation Term="UI.HiddenFilter" Bool="true"/>
<Annotation Term="Core.Immutable" Bool="true"/>
<Annotation Term="Core.Computed" Bool="true"/>
<Annotation Term="Core.Description" String="User's unique ID"/>
<Annotation Term="Common.Label" String="Created By"/>
</Annotations>
<Annotations Target="CatalogService.Orders/modifiedAt">
<Annotation Term="UI.HiddenFilter" Bool="true"/>
<Annotation Term="Core.Computed" Bool="true"/>
<Annotation Term="Common.Label" String="Changed On"/>
</Annotations>
<Annotations Target="CatalogService.Orders/modifiedBy">
<Annotation Term="UI.HiddenFilter" Bool="true"/>
<Annotation Term="Core.Computed" Bool="true"/>
<Annotation Term="Core.Description" String="User's unique ID"/>
<Annotation Term="Common.Label" String="Changed By"/>
</Annotations>
<Annotations Target="CatalogService.Orders/country">
<Annotation Term="Common.Label" String="Country"/>
<Annotation Term="Core.Description" String="Country code as specified by ISO 3166-1"/>
</Annotations>
<Annotations Target="CatalogService.Orders/country_code">
<Annotation Term="Common.Label" String="Country"/>
<Annotation Term="Common.ValueList">
<Record Type="Common.ValueListType">
<PropertyValue Property="Label" String="Country"/>
<PropertyValue Property="CollectionPath" String="Countries"/>
<PropertyValue Property="Parameters">
<Collection>
<Record Type="Common.ValueListParameterInOut">
<PropertyValue Property="LocalDataProperty" PropertyPath="country_code"/>
<PropertyValue Property="ValueListProperty" String="code"/>
</Record>
<Record Type="Common.ValueListParameterDisplayOnly">
<PropertyValue Property="ValueListProperty" String="name"/>
</Record>
</Collection>
</PropertyValue>
</Record>
</Annotation>
<Annotation Term="Core.Description" String="Country code as specified by ISO 3166-1"/>
</Annotations>
<Annotations Target="CatalogService.Countries">
<Annotation Term="UI.Identification">
<Collection>
<Record Type="UI.DataField">
<PropertyValue Property="Value" Path="name"/>
</Record>
</Collection>
</Annotation>
</Annotations>
<Annotations Target="CatalogService.Countries/name">
<Annotation Term="Common.Label" String="Name"/>
</Annotations>
<Annotations Target="CatalogService.Countries/descr">
<Annotation Term="Common.Label" String="Description"/>
</Annotations>
<Annotations Target="CatalogService.Countries/code">
<Annotation Term="Common.Text" Path="name"/>
<Annotation Term="Common.Label" String="Country Code"/>
</Annotations>
<Annotations Target="CatalogService.Countries_texts/name">
<Annotation Term="Common.Label" String="Name"/>
</Annotations>
<Annotations Target="CatalogService.Countries_texts/descr">
<Annotation Term="Common.Label" String="Description"/>
</Annotations>
<Annotations Target="CatalogService.Countries_texts/code">
<Annotation Term="Common.Text" Path="name"/>
<Annotation Term="Common.Label" String="Country Code"/>
</Annotations>
</Schema>
</edmx:DataServices>
</edmx:Edmx>
Further annotations
There are some annotations in the EDMX that we've not mentioned here. But you should be able to work out what they are, where they came from, and understand what they are for. That is a task for you to complete on your own. A clue here is that they relate to built-in CAP features relating to Common Types & Aspects.
Good luck, and happy annotating!
]]>
 .
.


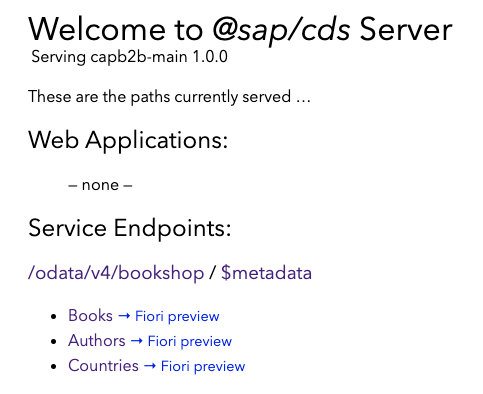


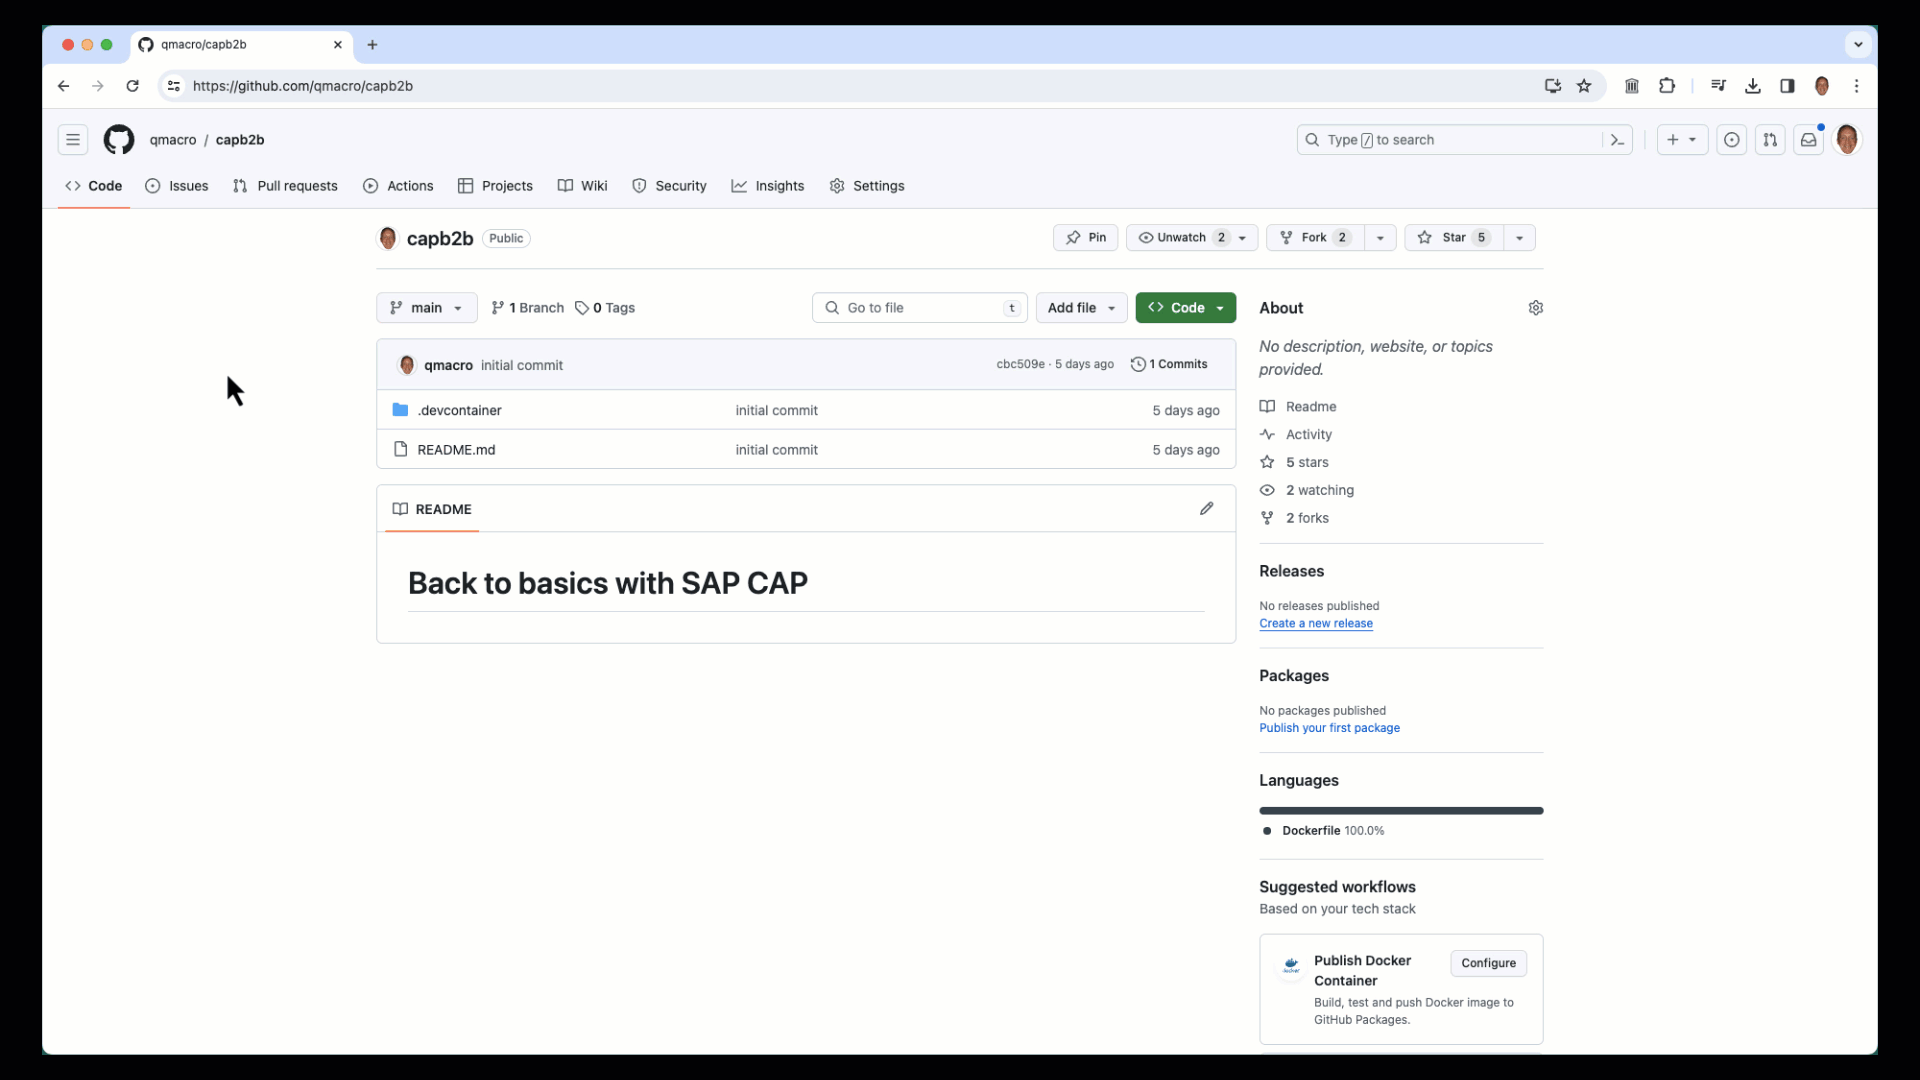


 Image courtesy of Enno Wulff
 Image courtesy of Enno Wulff


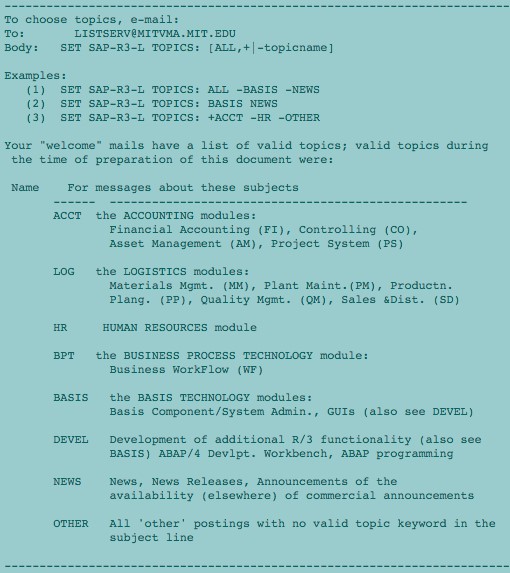
 The posting guidelines on our SAP-R3-L mailing list


 Picture courtesy of Wikimedia Commons


 CF on Kubernetes in Docker, on my laptop


 .
.
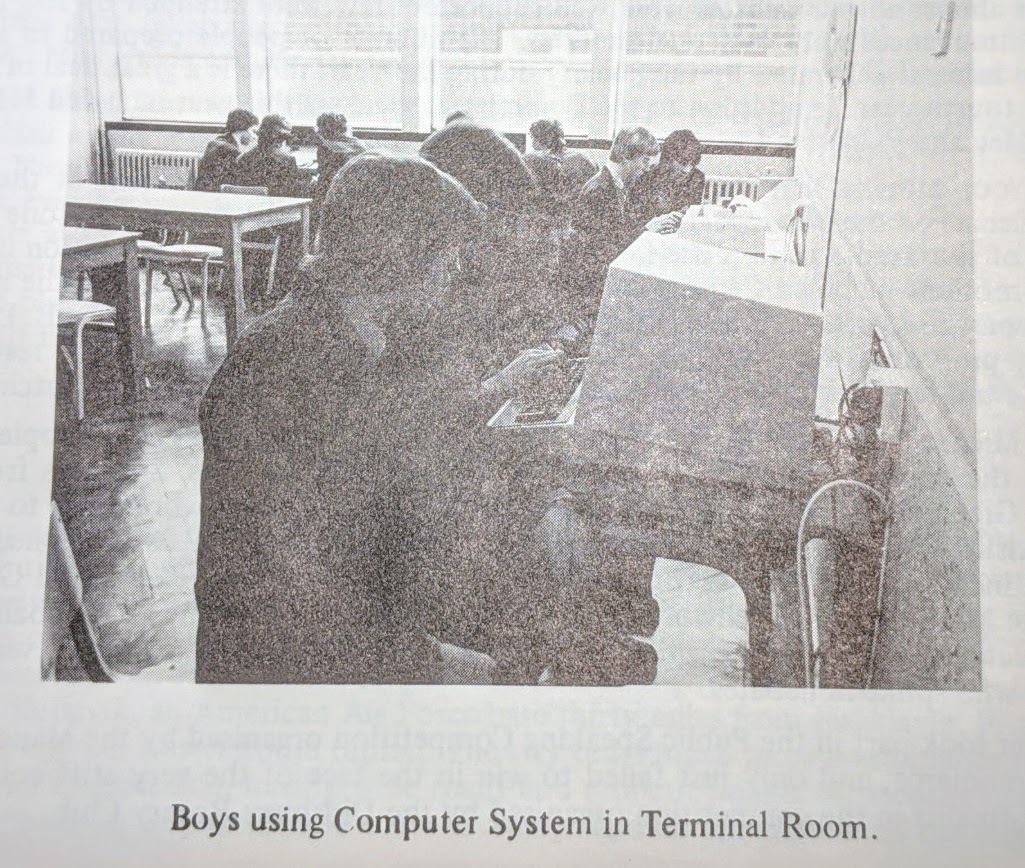 A photo that accompanied the article in the school magazine
 A Superterm Data Communications Terminal
 A Texas 733 terminal
 A Systime unit


 .
.


 (Photo


 Oh yes, one more thing – the instructor added an event for the camera button he added to the S4 view. The event he chose from the list was “tap”, which was right next to “press” in the list. Unfortunately


 ](http:/www.sdn.sap.com/irj/scn/go/portal/prtroot/docs/library/uuid/ea8db790-0201-0010-af98-de15b6c1ee1a?overridelayout=true)


 Explored, before its promotion.


 SAP’s open sourced UI development toolkit for HTML5 is SAPUI5’s twin with an Apache 2.0 licence. SAPUI5 is the basis for SAP’s UI innovation and with what SAP Fiori apps are built. Although still relatively young, it’s a very accomplished toolkit, and one I was eager to share with the open source developer community at large.
 I had deliberately set myself up for a fall, showing how difficult it can be to built hierarchies of controls in JavaScript, which then set the scene for my favoured approach of defining views declaratively, with XML being my favourite flavour in that vein. Luckily the audience seemed to appreciate the in-joke, and not everyone thought I was an idiot :-)


 ]
] One of the problems I have is that when I’m looking for an icon, the search term I have in my head is not necessarily going to match up with the name of the icon in the library.


 Well what a week that was. I spent it in Portland, Oregon, which for me being a fan of great coffee and great craft beer, was a fantastic city to be in. It was in Portland that O’Reilly’s Open Source Convention (OSCON) was held, and I was there helping SAP tell the world about OpenUI5 – you can read more about that in this post: “OpenUI5 Tutorial at OSCON 2014“. As usual, there’s lots to talk about, so let’s get going with this week’s TWIF picks.
 This year SAP is an


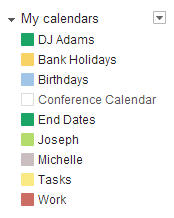 So I wrote a quick Google Apps Script hack to allow me to quickly specify the where/when events in a particular Google calendar that I maintain (called “Work”), and then have those events distributed, via invitations, to my other Outlook identities. It’s not very sophisticated – all it does is look through the Work calendar for all-day events matching a certain title pattern, then look at the guest list; if the emails I want to share the event with are not already on the list, they’re added, and invites are sent.
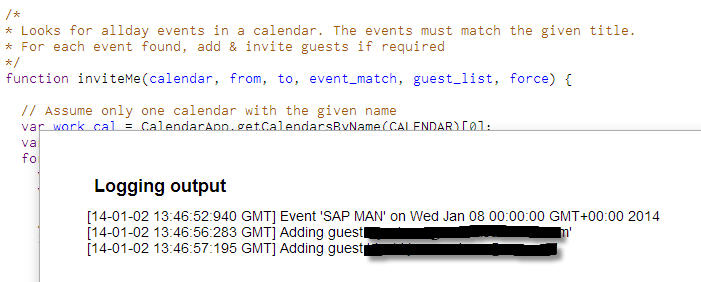


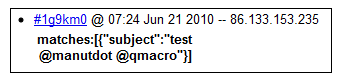 So from looking at what we get, we can see that what we’re after is the value of the ’subject’ key in the first element of the matches array.
 I wasn’t really sure what they were, but they looked fascinating. Unfortunately, they gathered dust after a while, mostly because there wasn’t anyone else to play against, and I didn’t understand the rules properly anyway. Fast forward to 2009. My son Joseph, having discovered and dusted off the box set, taught me how to play, at at Starbucks cafe over a few hot chocolates and cappuccinos on a cold winter afternoon.
 soaking up the countless minutes lost at the start of every meeting, while you wait for people to get started, fail to get the projector working, fetch coffees or fiddle with the air conditioning. And on paper, the MTG articles are good, but for a novice like me, there’s something missing. The articles make lots of references to cards by name, and when reading online, there’s a nice popup of the card details so you can see what the author is talking about. But on paper?


