Getting started with Gmail Contextual Gadgets
Gmail contextual gadgets were announced by Google a few months back and were made available to developers in May this year, just before making a strong appearance at Google IO.
Expanding upon the concept of an earlier contextual project called Dashboard, Gmail contextual gadgets give a clear message that email, as a universal information carrier and workflow pipeline, is not only here to stay, but is being given a new lease of life as it plays a foundational role in Google’s enterprise scale application platform strategy. A Gmail contextual gadget enhances email messages by providing information or functionality that is relevant to the context of that email … right inside the email itself. Context is exposed by content extractors in the form of ‘clues’ in Gmail (akin to Dashboard’s ‘cluepackets‘) and matched content is provided to the gadget at runtime.
Extractors, optional filters, and scope declarations (used by the installer of a gadget to decide whether to install or not based upon privacy and security requirements) are defined in a manifest, along with references to the gadgets themselves, via gadget spec files, that are to be triggered.

What makes these Gmail contextual gadgets even more attractive is the Google Apps Marketplace, where developers can make gadgets available, and consumers can use the “Add it now” button to start using them in their own domains.
Developing Gmail contextual gadgets is relatively straightforward, but there are a few things that might cause you to stumble, such as documentation (we’re early adopters!), cacheing issues and not being completely aware of what match information is provided.
Despite the advent of Wave and Buzz, it’s obvious that Google sees, rightly in my opinion, a tremendous amount of value in the venerable email application, and I thought I’d take the opportunity to document my first attempt at enhancing the contextual experience with a Twitter-flavoured Gmail contextual “Hello World” gadget.
Twitter User Info
‘Twitter User Info’ is a Gmail contextual gadget that provides basic info about Twitter users whose Twitter handles appear in the email Subject line. In this example, the profile image and basic Twitter user info is shown for Joseph, whose Twitter handle @jcla1 appears in the Subject of the email from Michelle:
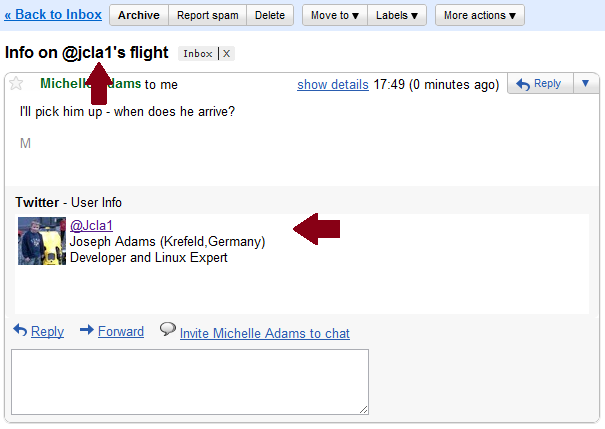
The contextual gadget appears directly below the email body, and starts with the title and description “Twitter – User Info” (defined in the gadget spec) and contains HTML showing the Twitter info.
Components and hosting
What are the components that make up this gadget? First of all, we need the manifest and the gadget spec itself. To support the dynamic creation of contextual content in the email, we will be using jQuery, not only because it’s a fantastically useful and powerful library for manipulating web page content, but also because of Google’s intention to use Caja to provide a layer of protection for the user of Javascript-based apps. The jQuery library is listed as one of the development frameworks that will be compatible with Caja. There’s also a tiny bit of CSS.
Beyond that, we will of course be making a call to one of the Twitter API endpoints, and calling upon one of my favourite HTTP tools PostBin, to dump Google gadget libary method return values for inspection.
While the manifest is uploaded to Google when you make your gadget available in the Marketplace, your gadget spec needs to be accessible online (so the gadget container can pull it in at the appropriate moment). There are many options for hosting content online, but for this experiment I decided to create a new App Engine application ‘qmacro-contextual‘ and host the gadget and CSS as static files there (I’m also storing the manifest there too). This might appear as overkill, but as I progress further into contextual gadget development, I will most definitely want to do some of the heavy app lifting outside of the actual gadget spec, and for this, App Engine is ideal.
Here’s part of the app.yaml file showing the handler declarations for the static manifest, gadget and CSS resources:
application: qmacro-contextual version: 1 runtime: python api_version: 1 handlers: - url: /manifests static_dir: manifests expiration: 1m - url: /gadgets static_dir: gadgets expiration: 1m - url: /css static_dir: css - url: .* script: main.py<span style="font-family: Georgia, 'Times New Roman', 'Bitstream Charter', Times, serif; line-height: 19px; white-space: normal; font-size: 13px;"> </span>
Note that I’ve specified an expiration period of 1 minute for the manifest and gadget spec directories. This is for development only, so that I can be sure that at least App Engine will serve up the resources with a very short shelf life, so that I can tweak the definitions and code and have them reloaded by the gadget container.
Incidentally, there’s also a URL query string parameter you can specify that causes gadget cacheing to be turned off – just append “?nogadgetcache=1″ to the Gmail URL and this should do the trick.
The Manifest
I followed the Developer’s Guide to construct the manifest, which you can see here in full:
http://qmacro-contextual.appspot.com/manifests/twitter-user-info.manifest.xml
The interesting parts of the manifest which relate to Gmail contextual gadgets are the Extractor, Gadget and Scope declarations.
The Extractor declaration looks like this:
<!-- EXTRACTOR --> <Extension id="SubjectExtractor" type="contextExtractor"> <Name>Twitter IDs in Subject</Name> <Url>google.com:SubjectExtractor</Url> <Param name="subject" value=".*@[a-z]+.*"/> <Triggers ref="TwitterUserInfoGadget"/> <Scope ref="emailSubject"/> <Container name="mail"/> </Extension>
Each extractor (there can be more than one for any given manifest) is defined with an id and name and references a particular Extractor ID which does the work of pulling the info out of the email. Here we’re referencing google.com:SubjectExtractor, which is an extractor provided by Google for pulling out the Subject line. Google will be opening up opportunities for developers to build their own extractors if the pre-defined ones don’t provide what we need.
The google.com:SubjectExtractor is defined as returning one output field, @subject, which is made available to the gadget to do with as it wishes – more on that later. It also has one scope defined, tag:google.com,2010:auth/contextual/extractor/SUBJECT, which must be linked with a scope definition in a later section of the manifest.
We can see the reference to the @subject output field in the tag. This is a filter definition, which says here that we only want the extractor to trigger the gadget if the email subject matches the given regular expression – i.e. if it contains a Twitter handle. Clearly, we want to avoid triggering gadgets when there’s nothing for the gadget to do; not only to avoid unnecessary almost-empty gadget displays, but also for performance reasons; without a filter, this extractor would fire for every email you looked at. The filter is optional, but Google recommends that even if you want to match on every occurrence, you put an explicit catch-all regular expression “.*” to make that clear.
The reference to “TwitterUserInfoGadget” points to the next declaration, that of the gadget itself:
<!-- GADGET --> <Extension id="TwitterUserInfoGadget" type="gadget"> <Name>Twitter User Info contextual gadget</Name> <Url>http://qmacro-contextual.appspot.com/gadgets/twitter-user-info.gadget.xml</Url> <Container name="mail"/> </Extension>
The id of the gadget, “TwitterUserInfoGadget” is what is referred to in the
http://qmacro-contextual.appspot.com/gadgets/twitter-user-info.gadget.xml
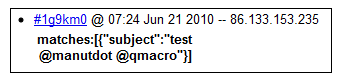
and this is what will be requested by the Gmail contextual gadget container to pull in the gadget spec. Here’s part of an App Engine log record showing the gadget spec being fetched:

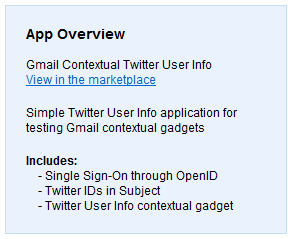
The name declared in this Gadget declaration (“Twitter User Info contextual gadget”), along with the name in the Extractor declaration (“Twitter IDs in Subject”) and the general name and description from elsewhere in the manifest, are text items that appear to the Google Apps domain administrator when selecting the gadget for installation, like this:
Finally, we have the Scope declaration, which was indicated in the Extractor declaration earlier. This is “emailSubject”, and contains the scope URI defined for the extractor being used. There may be more than one scope for a given extractor; if this is the case, they must be each defined separately and explicitly.
This information appears during gadget installation, where the administrator can review what the gadget will access, and decide whether or not to proceed:
The Gadget Spec – Declarations
Now we’ve dealt with the manifest, it’s time to turn our attention to the gadget spec. Remember that the gadget is triggered when we get a Subject line that contains one or more Twitter handles. If you’ve developed a gadget before, for iGoogle, for example, this should be familiar to you. First we have the ModulePrefs section where we declare basic gadget information and the features that we require. There’s a feature specific to Gmail contextual gadgets that we must declare here. Then we have the gadget code itself, in a CDATA section.
Here’s what the ModulePrefs section looks like:
<ModulePrefs title="Twitter" description="User Info" height="50" author="DJ Adams" author_email="dj.adams@pobox.com" author_location="Manchester"> <Require feature="dynamic-height"/> <Require feature="google.contentmatch"> <Param name="extractors"> google.com:SubjectExtractor </Param> </Require> </ModulePrefs>
The title and description in the module prefs shows up (”Twitter – User Info”) when the gadget is displayed at the bottom of the email. We define a height for the gadget which can be auto-adjusted later with the dynamic-height feature declared in this section too. A feature that’s specific to Gmail contextual gadgets, and that must be declared for all such gadgets, is google.contentmatch. In declaring this feature, you must list the Extractor id (or ids) that will be triggering this gadget.
The google.contentmatch feature gives us the facility we need to avail ourselves of the, ahem, content that was matched in this context. As you will see, we use the getContentMatches() method to do this.
The Gadget Spec – Code
With the ModulePrefs declarations out of the way, we get to the Javascript that breathes life into our gadget. The Javascript is defined in the
<script type='text/javascript' src='http://ajax.googleapis.com/ajax/libs/jquery/1.4.2/jquery.min.js'></script> <script type="text/javascript"> // Expect subject as first element keyed by 'subject' matches = google.contentmatch.getContentMatches(); jQuery.post('http://qmacro-postbin.appspot.com/1jd620g', 'matches:' + JSON.stringify(matches)); var subject = matches[0]['subject']; // Only do something if we actually have a subject to work with if (subject) { // Pick out the twitter @handles and process them var handles = subject.match(/@[a-z0-9_]+/g); if (handles) { $('head').append('<link rel="stylesheet" href="http://qmacro-contextual.appspot.com/css/twitter-user-info.css" />'); for (var i = 0; i < handles.length; i++) { var user_resource = 'http://api.twitter.com/users/show/' + handles[i] + '.json?callback=?'; $.getJSON(user_resource, function(data) { jQuery.post('http://qmacro-postbin.appspot.com/1jd620g', 'userinfo:' + JSON.stringify(data)); var loc = ""; if (data.location) { loc = ' (' + data.location + ')'; } var tw_info = '<table border="0">' + '<tr>' + '<td>' + '<a href="' + data.url + '">' + '<img src="' + data.profile_image_url + '" />' + '</a>' + '</td>' + '<td class="userinfo">' + '<a href="http://twitter.com/' + data.screen_name + '">@' + data.screen_name + '</a>' + '<br />' + data.name + loc + '<br />' + data.description + '</td>' + '</tr></table>'; jQuery(tw_info).appendTo('body'); }); } gadgets.window.adjustHeight(100); } } </script><span style="font-family: Georgia, 'Times New Roman', 'Bitstream Charter', Times, serif; font-size: small;"><span></span></span>
First, we pull in the jQuery library with a <script/> tag, and then we’re off with our gadget code.
We use the google.contentmatch.getContentMatches() method to pull in the matches supplied to us by the Extractor. One of my favourite phrases is “let the dog see the rabbit” – let’s have a look at the data, in this case. What does the getContentMatches() actually return? What does it look like? This is where the rather useful PostBin comes in to play. When we get the response from the call to getContentMatches(), encode it into a JSON string form with JSON.stringify() and bung the whole lot to a Postbin too see. Easy! Of course, this is only appropriate for development and debugging – I’d remove it for a production gadget. By the way, I’m running my own instance of Postbin – you can run you own instance too.
 So from looking at what we get, we can see that what we’re after is the value of the ’subject’ key in the first element of the matches array.
By definition, we’re only instantiated because there was a Twitter handle in the Subject. There could be more than one, of course. After collecting them into a handles array, we’re ready to process each one. First, though – we pull in the CSS resource to the current document. The resource is served as a static file from the App Engine app:
http://qmacro-contextual.appspot.com/css/twitter-user-info.css
For each of the Twitter handles, we want to display some basic info, as shown in the screenshot earlier. To retrieve this, we make a simple call to the Twitter API. Specifically,
http://api.twitter.com/users/show/[Twitter-handle].json?callback=?
will give us a nice chunk of JSON with the information we want, like this:
{ "description":"Developer and Linux Expert", "screen_name":"Jcla1", "url":"http://www.pipetree.com/josephadams", "name":"Joseph Adams", "profile_image_url":"http://a1.twimg.com/profile_images/106288960/JosephWithLomaxCar_normal.jpg", "location":"Krefeld,Germany", ... }
I’d originally started with the jTwitter jQuery plugin but found that it didn’t quite do what I wanted, and in any case using the Twitter API from jQuery is straightforward anyway. But thank you uzbekjon for getting me started.
You can see from the code that I’m making more use of Postbin, by gratuitously dumping the results of the Twitter API call in there too. I like to see what I’m dealing with. Data::Dumper is my alltime favourite Perl module, if you hadn’t guessed.
Once we have the info from Twitter, it’s just a simple matter of constructing some HTML, making use of the CSS via the ‘userinfo’ class, and appending that to the email. Job done!
I’ve pushed my fledgeling qmacro-contextual App Engine project to Github, so you can take a look and create your own “Hello World” Gmail contextual gadget.
Share and enjoy!