Serial interest in the Raspberry Pi
Joseph and I took delivery of our Raspberry Pi earlier this year, and today attended the Manchester Raspberry Jam held at Madlab, a group of Raspberry Pi enthusiasts getting together to share experiences of this micro computer that seems to have re-kindled the hacking passion of 30 years ago. I say 30 years ago because the last time I remember this sort of passion and interest was when I used to attend a local computer club, where members showed their latest hardware and software projects based on micros like the Acorn Atom and others of that era. Home-made cases, low-level programming and soldering were the norm, and are the norm again.
One of my interests is retrocomputing, in particular, serial terminals. I had a great collection of them a while ago (VT320s, VT330+s, VT420s, and various Wyse models) all connected to multiple serial ports in the back of a Linux box (the serial signals actually running over Cat5 and re-converted at the patch-panel end, but that’s another story). Sadly I no longer have any of these terminals (another story again) but my friend Robert Shiels recently donated a Wyse WY-30 to me. Joseph and I decided to bring it along to the Raspberry Jam and do a show-n-tell on connecting it up to the Pi. The ultimate goal is to have a standalone serial terminal, good looking enough and retro enough to have in the living room, with a Raspberry Pi actually inside it, with a serial cable connection to connect, and a wifi adapter to hop on to the local network and from then on to the Internet. A silent, 80×24 green screen connection to life, the universe and everything.
Making the serial connection
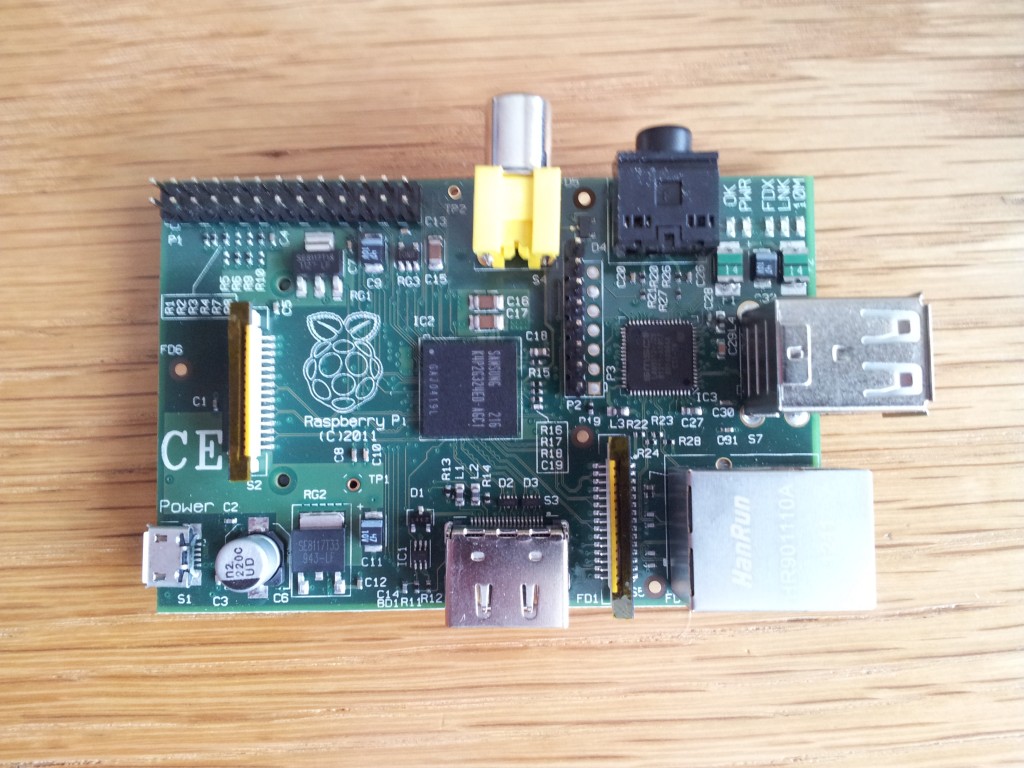
First things first. The Pi has 2 rows of general purpose input / output (GPIO) pins at 3.3V (top left in the picture), but that means that we can’t use an RS232 serial connection directly as the voltage levels are too high. Rather than build or buy a converter, we used a simpler method. Most modern Linux distributions, including Debian Squeeze, provide support for USB serial ports, so getting hold of a USB serial cable was the first job. This connects to one of the USB ports on the Pi, and has a 9 pin D serial connector on the other end.
Booting up the Pi with the USB serial cable connection shows this:
raspberrypi kernel: usbserial: USB Serial Driver core
raspberrypi kernel: USB Serial support registered for pl2303
raspberrypi kernel: pl2303 1-1.3:1.0: pl2303 converter detected
raspberrypi kernel: usb 1-1.3: pl2303 converter now attached to ttyUSB0
Aha! ttyUSB0. This means we have a device handle that we can use.
Connecting the USB serial cable to the terminal won’t work directly; we need to have the RX and TX connections reversed (so that RX sends to TX and vice versa). A handy null-modem cable will sort this out for us. So at this point we have Pi USB -> serial connector -> null-modem cable -> terminal.
Getting the login prompt
Connecting the terminal to the USB serial port is one thing; getting a login prompt on it requires more work. This is where the lowly ‘getty’ (from ‘get teletype’) program comes in. Getty is from a long-gone era of physical teletypes and text terminals, and is used to manage these terminals by listening for a connection, displaying a login prompt, and running the login program to authenticate a user.
Getty needs to know a few things: what serial port to listen for a connection on, what speed the connection is expected to be at, and what terminal type the remote terminal is.
The invocation of getty we will use (as root) is this:
/sbin/agetty -L ttyUSB0 19200 wy30
(I’m actually using agetty here, an alternative getty program with some useful extra features).
This says: listen on ttyUSB0 for a connection, at baud rate 19200, don’t bother with carrier detect (i.e. force the line to be local), and set the terminal type to be wy30.
If you’ve got the serial cable connection right, and you’ve configured the terminal settings to be 19200 (at 8N1, i.e. 8 bits, no parity, 1 stop bit), you should see this on the terminal:
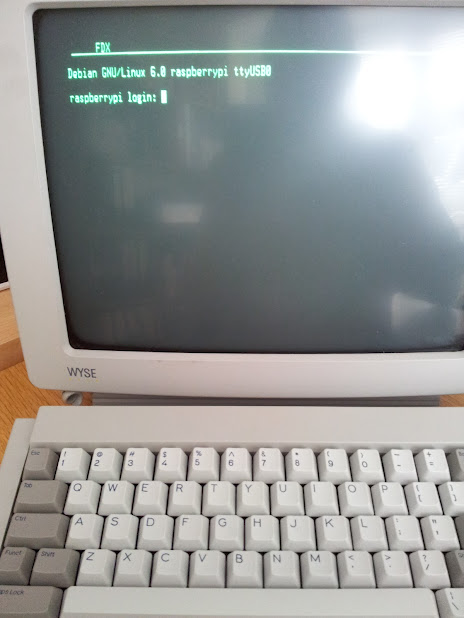
Wonderful!
One thing you probably want is to have getty listen out for a serial terminal connection all the time, from boot. To do this, add a line to /etc/inittab like this:
T0:23:respawn:/sbin/agetty -L ttyUSB0 19200 wy30
This means you can disconnect and reconnect on your terminal at will.
Adapting the terminal settings
Arguably the most common terminal standard is VT100. This came from the DEC terminals of yore, and through popularity became the de facto standard that OEM terminals emulated, and it’s what software terminals such as PuTTY will emulate for you too. The Wyse WY-30 that we have has a terminal standard, or ‘personality’ which is ‘WY30+’. It will also emulate TVI910+, TVI925 and ADDS A2. Not a VT100. So that’s why we specify ‘wy30′ on the getty invocation.
But that specification won’t work unless the Pi knows how to speak WY30, and for that, the terminfo database is used. Terminfo is a library of escape sequences for manipulating display terminals. Moving the cursor around, clearing the screen, that sort of thing. Termcap is a similar library that predates terminfo.
The Debian Squeeze distribution that was put together for the Pi doesn’t include the terminfo database, but a quick apt-get invocation later, and we have it:
sudo apt-get install ncurses-term
Now we have the wy30 entry in the database, as a file ‘wy30′ in /usr/share/terminfo/w/.
With the file containing the appropriate escape codes to control a Wyse WY-30 terminal available in terminfo, and the specification of ‘wy30′ in the getty call, we have all we need to start a productive session on the serially attached terminal.
Rebooting to check that the init spawning of getty is working correctly, and we can log in at our Wyse terminal and use tools such as top, vim, tmux and others that manipulate the screen, without problem.
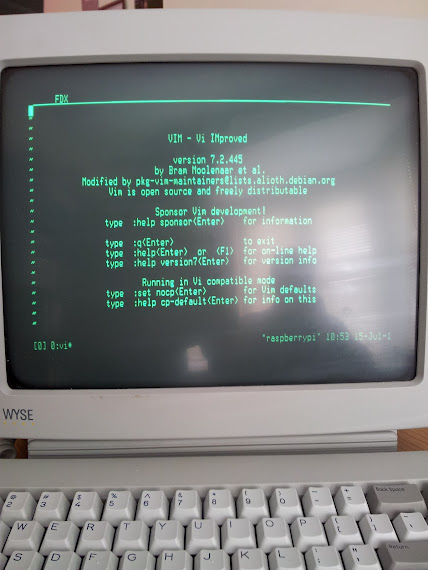
Success!
- ← Previous
SAPUI5 - the future direction of SAP UI development? - Next →
Recent Interests